NEC 60XP10 42PX10 50XP10 60XP10 user's manual
NEC 60XP10 - PlasmaSync - 60" Plasma Panel Manual
 |
UPC - 805736019452
View all NEC 60XP10 manuals
Add to My Manuals
Save this manual to your list of manuals |
NEC 60XP10 manual content summary:
- NEC 60XP10 | 42PX10 50XP10 60XP10 user's manual - Page 1
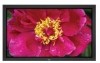
User's Manual English EXIT INPUT MUTE PlasmaSync 42XP10 PlasmaSync 50XP10 PlasmaSync 60XP10 - NEC 60XP10 | 42PX10 50XP10 60XP10 user's manual - Page 2
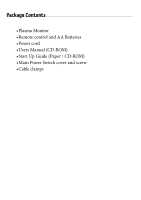
Package Contents •Plasma Monitor •Remote control and AA Batteries •Power cord •Users Manual (CD-ROM) •Start Up Guide (Paper / CD-ROM) •Main Power Switch cover and screw •Cable clamps - NEC 60XP10 | 42PX10 50XP10 60XP10 user's manual - Page 3
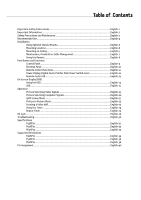
the Timer...English-24 Repeat Timer ...English-25 RS-232C ...English-26 Troubleshooting...English-30 Specifications P42XP10 ...English-31 P50XP10 ...English-32 P60XP10 ...English-33 Supported Resolutions P42XP10 ...English-34 P50XP10 ...English-36 P60XP10 ...English-38 Pin Assignment...English-40 - NEC 60XP10 | 42PX10 50XP10 60XP10 user's manual - Page 4
with the manufacturer's instructions. 8. Do not Only use attachments/accessories specified by the all servicing to qualified service personnel. Servicing is required All monitors must Ceiling Mounting - The appliance should be mounted to a wall/ceiling the mats and supporting structure, grounding - NEC 60XP10 | 42PX10 50XP10 60XP10 user's manual - Page 5
user that important literature concerning the operation and maintenance of this unit has been included. Therefore, it should be read carefully in order to avoid any problems. CAUTION: Please use the power cord provided with this display (P50XP10), or P606Y2(P60XP10) color monitor so the instructions, - NEC 60XP10 | 42PX10 50XP10 60XP10 user's manual - Page 6
THE MONITOR: The plasma display's panel is made up of fine picture elements (cells), of which more than 99.99 percent are active cells. Some cells may not produce light or remain constantly lit. For safe operation and to avoid damaging the unit, read carefully and observe the following instructions - NEC 60XP10 | 42PX10 50XP10 60XP10 user's manual - Page 7
monitor at a 90 degree angle to windows and other light sources to minimize glare and reflections. • Clean the monitor equipment is not for use at video display work station according to Bildscharb V. For peel. CLEANING THE VENT HOLES • Clean plasma ventilation areas using a vacuum cleaner with a - NEC 60XP10 | 42PX10 50XP10 60XP10 user's manual - Page 8
pastel colors whenever possible. • Avoid displaying images with few colors and distinct, sharply defined borders between colors. Plasma monitor driving sound • The panel of the Plasma monitor is composed of extremely fine pixels and these pixels emit light according to received video signals. This - NEC 60XP10 | 42PX10 50XP10 60XP10 user's manual - Page 9
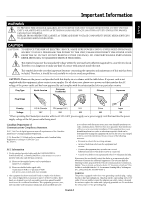
• Use the specified clasps for installation. • Take necessary steps to prevent the unit from tipping or falling. Mounting Location The ceiling and wall must be strong enough to support the monitor and mounting accessories. • DO NOT install in locations where a door or gate can hit the unit. • DO NOT - NEC 60XP10 | 42PX10 50XP10 60XP10 user's manual - Page 10
. If a problem is detected, please refer to qualified personnel for service. • Regularly check the mounting location for signs of damage or weakness that may occur over time. Please note the following when mounting on wall or ceiling. • When using mounting accessories other than those that are NEC - NEC 60XP10 | 42PX10 50XP10 60XP10 user's manual - Page 11
usage of batteries can result in leaks or bursting. NEC recommends the following battery use: • Place "AA" illumination strikes the remote control sensor of the Plasma monitor, or when there is an object in the MODE SIZE 1 2 4 5 7 8 0 DISPLAY 3 6 9 MENU AUTO SET UP SET + EXIT VOL ZOOM - NEC 60XP10 | 42PX10 50XP10 60XP10 user's manual - Page 12
. 8) EXIT Activates the OSD menu when the OSD menu is off. Exits from the current menu being displayed to the previous menu within the OSD. 9) Remote control sensor and Power indicator Receives the signal when using the wireless remote control. Glows green when the monitor is active. Glows red when - NEC 60XP10 | 42PX10 50XP10 60XP10 user's manual - Page 13
HD1 AUDIO1 VIDEO SPEAKER (S) AC IN 2 3 4 5 6 1) EXTERNAL CONTROL OUT (D-Sub 9 pin) Connect RS-232C output to a second monitor. 2) EXTERNAL component source. For proper operation select "BNC INPUT" in the OPTION1 OSD menu. 7) AUDIO2 Input the audio signal from external equipment such as a - NEC 60XP10 | 42PX10 50XP10 60XP10 user's manual - Page 14
Set REMOTE ID. 1 2 3 4 5 6 POWER ON STANDBY PICTURE RGB DVD/HD VIDEO MEMORY PICTURE MODE SIZE 7 8 9 10 11 12 13 14 1 2 3 4 5 6 7 8 9 0 DISPLAY MENU AUTO SET UP SET + EXIT VOL ZOOM POINTER + + MUTE SPLIT SCREEN PIP S BY S SINGLE SWAP SELECT/FREEZE CAPTURE REMOTE ID SET - NEC 60XP10 | 42PX10 50XP10 60XP10 user's manual - Page 15
or the Power button (on the unit) to turn off the monitor. Main Power Switch Cover Included with the display is a cover for the Main Power Switch. Use this cover Switch Cover POINTER Use the Pointer to point to a specific area on the screen. Press the UP and DOWN or PLUS and MINUS buttons - NEC 60XP10 | 42PX10 50XP10 60XP10 user's manual - Page 16
specific Monitor ID number. When 0 is selected or when the remote control is in normal mode, all monitors will be operated. Figure 1 Remote in Normal mode or the REMOTE ID is set to 0 POWER ON STANDBY PICTURE RGB DVD/HD VIDEO MEMORY PICTURE MODE SIZE 1 2 3 4 5 6 7 8 9 0 DISPLAY MENU - NEC 60XP10 | 42PX10 50XP10 60XP10 user's manual - Page 17
or the EXIT button on the Control Panel. 2. Use the up and down buttons to select the desired menu. 3. Press the SET button to select a sub-menu or item for adjustment. On-Screen Display (OSD) 4. Change the setting or adjustment by pressing the + and - buttons on the Control Panel or the Remote - NEC 60XP10 | 42PX10 50XP10 60XP10 user's manual - Page 18
Display (OSD) Main Menu PICTURE AUDIO Sub Menu types of movies. Raises the dark parts and lowers the light parts of the image. (S-Curve) These values are input to use with the video source. Default 50 50 50 50 50 STANDARD OFF MID 50 50 50 OFF 2.2 50 50 50 50 50 50 OFF 0 0 0 VIDEO1 DVD/HD1 VGA - NEC 60XP10 | 42PX10 50XP10 60XP10 user's manual - Page 19
MODE menu. OFF: UNDERSCAN item is not selectable in the ASPECT MODE menu. Video problem with signal detection, this function forces the monitor to display the signal at the desired resolution. If no problem is detected, the only available option will be "AUTO". VGA and RGBHV input only. Manually - NEC 60XP10 | 42PX10 50XP10 60XP10 user's manual - Page 20
232C connection. OFF: When NEC protocol is used (normal). working schedule for the monitor to use. See page 24 for instructions. Sets the input menu goes off. To return to normal operation, press the "DISPLAY" button on the remote controller for 5 seconds. Change the loop out setting. Sets the Monitor - NEC 60XP10 | 42PX10 50XP10 60XP10 user's manual - Page 21
items are shown for advanced users. OFF: Some of the advanced menu items are not shown. Select the language used by the OSD. The Color System that is used depends on the video format of the input signal. VIDEO input only. Display information about the display: frequencies, polarities, etc. Default - NEC 60XP10 | 42PX10 50XP10 60XP10 user's manual - Page 22
Picture Size Using Video Signals Select one of seven picture sizes manually. While viewing videos or digital video discs, perform the following (Underscan) images. Utilize the UNDERSCAN function in the SCREEN menu to display the entire image. DYNAMIC Vertically and horizontally expands the picture - NEC 60XP10 | 42PX10 50XP10 60XP10 user's manual - Page 23
. When using a VGA or SVGA signal, PICTURE SIZE in the OPTION 2 OSD menu should be set to OFF to select TRUE mode. Information: Supported resolutions: For further information on the display output of the various VESA signal standards supported by the unit, see pages 34 - 39. When 1360 dot x 768 line - NEC 60XP10 | 42PX10 50XP10 60XP10 user's manual - Page 24
Operation - continued Split Screen Mode To display multiple pictures on the screen, perform the following actions: 1. Press the desired SPLIT SCREEN function button on the remote (PIP, S BY S, SINGLE). Only certain RGB signals are supported. SINGLE button A PIP button S BY S button VGA PIP - NEC 60XP10 | 42PX10 50XP10 60XP10 user's manual - Page 25
the front of the unit. Adjusting the OSD controls 1. To make the desired picture active, press the SELECT/ FREEZE button. 2. To display the main menu, press the MENU button. 3. Adjust the settings as desired. NOTE: Some OSD functions may not be available in SplitScreen mode. Press the SELECT/FREEZE - NEC 60XP10 | 42PX10 50XP10 60XP10 user's manual - Page 26
x 2 NO. 1 NO. 2 Information: Set the LOOP OUT in OPTION3 to ON to loop signals out to another plasma display. • Set the VIDEO WALL options properly when creating a video wall. • Use the appropriate (length and efficiency) BNC cable to connect monitors. • If the image quality is poor, do not use the - NEC 60XP10 | 42PX10 50XP10 60XP10 user's manual - Page 27
the MAIN MENU to access the TIMER feature in OPTION3. To user the TIMER feature the first set the internal clock and the day of the week. The display can ORBITER, INVERSE, WHITE) or a REPEAT TIMER program can be set for the monitor to use during the scheduled power-on time. NOTE: When a REPEAT TIMER - NEC 60XP10 | 42PX10 50XP10 60XP10 user's manual - Page 28
to alternate between inputs at user-determined intervals. For example the display can be programmed to show the signal from "VIDEO1" for 10 minutes and then switch to showing the signal from the DVI input for 10 minutes. To set the Repeat Timer select "REPEAT" in the Timer menu, then press the SET - NEC 60XP10 | 42PX10 50XP10 60XP10 user's manual - Page 29
RS-232C output from this monitor to another monitor's RS-232C input. Up to 26 monitors can be connected using RS-232C. 2. Set Monitor ID and RS-232C Control mode. For proper operation, the Monitor ID should be set in the OSD menu of each monitor that is in the chain. The Monitor ID can be set under - NEC 60XP10 | 42PX10 50XP10 60XP10 user's manual - Page 30
the following control commands, all of the daisy-chained monitors can be controlled at the same time from the primary monitor. However, reply and status commands will only pertain to the primary monitor, and not to the secondary monitors. 1) Interface PROTOCOL BAUD RATE DATA LENGTH PARITY BIT STOP - NEC 60XP10 | 42PX10 50XP10 60XP10 user's manual - Page 31
command. 3) The personal computer checks the command and confirms if the command which has been sent has been executed or not. 4) This Plasma monitor sends various codes other than the return code. When sending a control sequence via RS-232C, other codes from personal computers will be ignored - NEC 60XP10 | 42PX10 50XP10 60XP10 user's manual - Page 32
status to host computer. When the Host computer checks the Power status of monitor, the status of monitor is powered-on. Command from computer 30 30 76 50 0D '0''0''v''P'[enter] Command from Monitor 30 30 76 50 31 0D '0''0''v''P''1'[enter] Detail of command Ask about the power status of - NEC 60XP10 | 42PX10 50XP10 60XP10 user's manual - Page 33
in the ON position and power cord should be connected. Red LED on monitor is blinking • A certain failure might have occurred, please contact your nearest authorized NEC DISPLAY SOLUTIONS service facility. Troubleshooting Display image is not sized properly • Use the OSD screen controls to increase - NEC 60XP10 | 42PX10 50XP10 60XP10 user's manual - Page 34
PDP Module Frequency Panel Display Size Input Signals Output Signal (VIDEO1 and VGA can also be used as OUTPUT terminals) Audio Speaker Output External Control Power Supply Operational Environment Storage Environment Dimensions Weight (without speaker and stand ) VESA compatible arm mounting - NEC 60XP10 | 42PX10 50XP10 60XP10 user's manual - Page 35
Dimensions Weight (without speaker and stand ) VESA compatible arm mounting interface Complied Regulatory and Guidelines Power Management Plug & Play Accessories *Compressed Image Diagonal: 50 control, AA Batteries, Power cord, Users Manual (CD-ROM), Start Up Guide (Paper / CD-ROM), Main Power Switch - NEC 60XP10 | 42PX10 50XP10 60XP10 user's manual - Page 36
PDP Module Frequency Panel Display Size Input Signals Output Signal (VIDEO1 and VGA can also be used as OUTPUT terminals) Audio Speaker Output External Control Power Supply Operational Environment Storage Environment Dimensions Weight (without speaker and stand ) VESA compatible arm mounting - NEC 60XP10 | 42PX10 50XP10 60XP10 user's manual - Page 37
1024 97 1024 X 768 98 1280 X 1024 Specification of the signal V freq. H freq. Signal .3 70 87.5 75 93.8 85 106.3 50 56.2 60 67.5 Wide-UXGA 59.9 74 - -- - - -- - - -- - - -- - - 4 1024X768 -- - - - Not Supported NORMAL (4:3) 768 pixels x 768 lines FULL(16 : 9 ) 1024 - NEC 60XP10 | 42PX10 50XP10 60XP10 user's manual - Page 38
1366 X 768 1024 X 768 853 X 480 Specification of the signal V freq. H freq. Signal Type (Hz) (kHz) 59.9 15.8 59.9 15.8 50 15.6 59.9 15.8 50 15.6 59.9 15.8 50 15.6 59.9 15.8 50 15.6 59.9 31.5 50 31.3 50 37.5 60 45 50 28.1 60 33.8 50 56.3 60 67.5 30 33.8 24 - NEC 60XP10 | 42PX10 50XP10 60XP10 user's manual - Page 39
P50XP10 Supported Resolutions (PC) English-36 IBM X 900 96 1280 X 1024 97 1024 X 768 98 1280 X 1024 Specification of the signal V freq. H freq. Signal Type (HZ) (kHz) UXGA 60 75 65 81.3 70 87.5 75 93.8 85 106.3 50 56.2 60 67.5 Wide-UXGA 59.9 74.6 Wide-UXGA 60 74 - NEC 60XP10 | 42PX10 50XP10 60XP10 user's manual - Page 40
1366 X 768 1024 X 768 853 X 480 Specification of the signal V freq. H freq. Signal Type (Hz) (kHz) 59.9 15.8 59.9 15.8 50 15.6 59.9 15.8 50 15.6 59.9 15.8 50 15.6 59.9 15.8 50 15.6 59.9 31.5 50 31.3 50 37.5 60 45 50 28.1 60 33.8 50 56.3 60 67.5 30 33.8 24 - NEC 60XP10 | 42PX10 50XP10 60XP10 user's manual - Page 41
1024 97 1024 X 768 98 1280 X 1024 Specification of the signal V freq. H freq. Signal Type 70 87.5 75 93.8 85 106.3 50 56.2 60 67.5 Wide-UXGA 59.9 74 - -- - - -- - - -- - - -- - - 4 1024X768 -- - - - Not Supported NORMAL (4:3) 1024 pixels x 768 lines FULL (16:9) 1366 - NEC 60XP10 | 42PX10 50XP10 60XP10 user's manual - Page 42
1366 X 768 1024 X 768 853 X 480 Specification of the signal V freq. H freq. Signal Type (Hz) (kHz) 59.9 15.8 59.9 15.8 50 15.6 59.9 15.8 50 15.6 59.9 15.8 50 15.6 59.9 15.8 50 15.6 59.9 31.5 50 31.3 50 37.5 60 45 50 28.1 60 33.8 50 56.3 60 67.5 30 33.8 24 - NEC 60XP10 | 42PX10 50XP10 60XP10 user's manual - Page 43
English 1) Analog RGB Input (Mini D-SUB 15P) VGA Pin No. Name 1 Video Signal Red 2 Video Signal Green 3 Video Signal Blue 1 4 GND 5 6 5 DDC-GND 10 11 15 6 Red-GND 7 Green-GND 8 Blue-GND 9 +5V (DDC) Mini D-SUB 15P 10 SYNC-GND 11 GND 12 DDC-SDA 13 H-SYNC 14 V-SYNC 15 DDC-SCL 2) - NEC 60XP10 | 42PX10 50XP10 60XP10 user's manual - Page 44
the mark (left) must be disposed of separately from normal household waste. This includes monitors and electrical accessories, such as signal cables or power cords. When you need to dispose of your NEC display products, please follow the guidance of your local authority, or ask the shop where you
-
 1
1 -
 2
2 -
 3
3 -
 4
4 -
 5
5 -
 6
6 -
 7
7 -
8
-
9
-
10
-
11
-
12
-
13
-
14
-
15
-
16
-
17
-
18
-
19
-
20
-
21
-
22
-
23
-
24
-
25
-
26
-
27
-
28
-
29
-
30
-
31
-
32
-
33
-
34
-
35
-
36
-
37
-
38
-
39
-
40
-
41
-
42
-
43
-
44
 |
 |

PlasmaSync 42XP10
PlasmaSync 50XP10
PlasmaSync 60XP10
EXIT
MUTE
INPUT
English
User’s Manual