NEC EX341R-BK Users Manual - Page 26
USB Hub does not operate, Human/Ambient light sensor does not work
 |
View all NEC EX341R-BK manuals
Add to My Manuals
Save this manual to your list of manuals |
Page 26 highlights
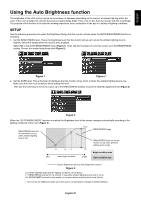
Display image is not sized properly • Use the OSD Image Adjust controls to increase or decrease the Coarse adjustment. • Check to make sure that a supported mode has been selected on the display card or system being used. (Please consult display card or system manual to change graphics mode.) • When using an HDMI input, please change "OVER SCAN". • Check to make sure that the appropriate resolution has been selected in H.RESOLUTION and V.RESOLUTION. No Video • If no video is present on the screen, turn the Power key off and on again. • Make certain the computer is not in a power-saving mode (touch the keyboard or mouse). • Some display cards do not output video signal when monitor is turned OFF/ON or disconnect/connect from the AC power cord under low resolution with DisplayPort. • When using an HDMI input, please change "OVER SCAN". No Sound • Make sure the speaker cable is proper connected. • Check to see if mute is activated. • Check the volume in the OSD menu. • Check selected OSD's Tools to "SOUND INPUT", when DisplayPort or HDMI is in use. Brightness variations over time • Change Auto Brightness to OFF and adjust brightness. • Change DV MODE to STANDARD and adjust brightness. NOTE: When Auto Brightness is set to ON, the monitor automatically adjusts brightness based on the environment. When the brightness of surrounding environment changes, the monitor will also change. USB Hub does not operate • Check to make sure the USB cord is properly connected. Refer to your USB device User's Manual. • Check if the USB upstream port on the monitor is connected to the USB downstream port on the computer. And make sure the computer is ON. Human/Ambient light sensor does not work • Make sure there is no object in front of Human/Ambient light sensor. • Please use the provided stereo micro plug cable. • Check to make sure that stereo micro plug cable is connected correctly. ControlSync does not work • Check to make sure that ControlSync cable is connected correctly. • Check to make sure that ControlSync cable is not in "loop" connection. • Master monitor should be connected OUT connector only. • Please use provided ControlSync cable. • You can use up to 24 sub monitors via ControlSync. No picture in multiple monitor connection • Check to make sure that the resolution has been lower than the recommended resolution setting. • Check to make sure that the display card supports MST (multi-stream transport). • The number of monitors daisy-chained through SST (single-stream transport) depends on HDCP contents limitation. • Monitors should be connected by the included DisplayPort cable. • Check to make sure that DP OUT MULTISTREAM is "AUTO" and BIT RATE setting is "HBR2" when using MST (multistream transport) (see page 12). English-24
-
 1
1 -
2
-
3
-
4
-
5
-
6
-
7
-
8
-
9
-
10
-
11
-
12
-
13
-
14
-
15
-
16
-
17
-
18
-
19
-
20
-
 21
21 -
 22
22 -
 23
23 -
 24
24 -
 25
25 -
 26
26 -
 27
27 -
 28
28 -
 29
29 -
 30
30
 |
 |
