NEC NP-M300WS Users Manual - Page 133
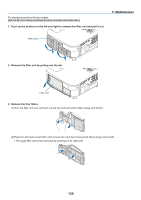
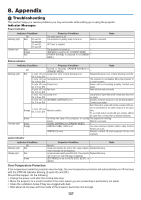
To replace the filters, Push the catch to release the filter unit and pull it out.
 |
UPC - 805736036329
View all NEC NP-M300WS manuals
Add to My Manuals
Save this manual to your list of manuals |
Page 133 highlights
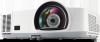
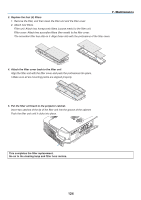
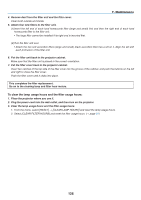
7. Maintenance To replace the filters: Filter removal procedure is different depending on the model. Follow the procedure suitable for your model. Four filters are packaged with the replacement lamp. Honeycomb filter (coarse mesh): Large and small sizes (attached to the filter unit) Accordion filter (fine mesh): Large and small sizes (attached to the filter cover) NOTE: • Replace all four filters at the same time. • Before replacing the filters, wipe off dust and dirt from the projector cabinet. • The projector is precision equipment. Keep out dust and dirt during filter replacement. • Do not wash the filters with soap and water. Soap and water will damage the filter membrane. • Put filters into place. Incorrect attachment of a filter may cause dust and dirt to get into the inside of the projector. Before replacing the filters, replace the lamp. (→ page 120) [M350X/M300X/M260X/M230X/M300W/M260W] 1. Push the catch to release the filter unit and pull it out. WIRELESS 2. Detach the filter cover from the filter unit. The filter cover is fixed at six separate mounting points. Bow the filter cover by pushing it slightly until it releases. Notch Filter unit WIRELESS Filter cover 123
-
 1
1 -
2
-
3
-
4
-
5
-
6
-
7
-
8
-
9
-
10
-
11
-
12
-
13
-
14
-
15
-
16
-
17
-
18
-
19
-
20
-
21
-
22
-
23
-
24
-
25
-
26
-
27
-
28
-
29
-
30
-
31
-
32
-
33
-
34
-
35
-
36
-
37
-
38
-
39
-
40
-
41
-
42
-
43
-
44
-
45
-
46
-
47
-
48
-
49
-
50
-
51
-
52
-
53
-
54
-
55
-
56
-
57
-
58
-
59
-
60
-
61
-
62
-
63
-
64
-
65
-
66
-
67
-
68
-
69
-
70
-
71
-
72
-
73
-
74
-
75
-
76
-
77
-
78
-
79
-
80
-
81
-
82
-
83
-
84
-
85
-
86
-
87
-
88
-
89
-
90
-
91
-
92
-
93
-
94
-
95
-
96
-
97
-
98
-
99
-
100
-
101
-
102
-
103
-
104
-
105
-
106
-
107
-
108
-
109
-
110
-
111
-
112
-
113
-
114
-
115
-
116
-
117
-
118
-
119
-
120
-
121
-
122
-
123
-
124
-
125
-
126
-
127
-
 128
128 -
 129
129 -
 130
130 -
 131
131 -
 132
132 -
 133
133 -
 134
134 -
 135
135 -
 136
136 -
 137
137 -
 138
138 -
139
-
140
-
141
-
142
-
143
-
144
-
145
-
146
-
147
-
148
-
149
-
150
-
151
-
152
-
153
-
154
-
155
 |
 |
