NEC NP-UM330X NP02Wi Installation Manual - Page 12
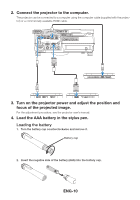
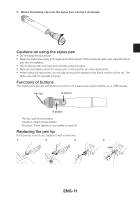
Load the AAA battery in the stylus pen.
 |
View all NEC NP-UM330X manuals
Add to My Manuals
Save this manual to your list of manuals |
Page 12 highlights
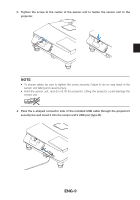
2. Connect the projector to the computer. The projector can be connected to a computer using the computer cable (supplied with the projector) or a commercially available HDMI cable. 3. Turn on the projector power and adjust the position and focus of the projected image. For the adjustment procedure, see the projector user's manual. 4. Load the AAA battery in the stylus pen. Loading the battery 1. Turn the battery cap counterclockwise and remove it. Battery cap 2. Insert the negative side of the battery (AAA) into the battery cap. ENG-10
-
 1
1 -
2
-
3
-
4
-
5
-
6
-
 7
7 -
 8
8 -
 9
9 -
 10
10 -
 11
11 -
 12
12 -
 13
13 -
 14
14 -
 15
15 -
 16
16 -
 17
17 -
18
-
19
-
20
-
21
-
22
-
23
-
24
-
25
-
26
-
27
-
28
-
29
-
30
-
31
-
32
-
33
-
34
-
35
-
36
-
37
-
38
-
39
-
40
-
41
-
42
-
43
-
44
-
45
-
46
-
47
-
48
-
49
-
50
-
51
-
52
-
53
-
54
-
55
-
56
-
57
-
58
-
59
-
60
-
61
-
62
-
63
-
64
-
65
-
66
-
67
-
68
-
69
-
70
-
71
-
72
-
73
-
74
-
75
-
76
-
77
-
78
-
79
-
80
-
81
-
82
-
83
-
84
-
85
-
86
-
87
-
88
-
89
-
90
-
91
-
92
-
93
-
94
-
95
-
96
-
97
-
98
-
99
-
100
-
101
-
102
-
103
-
104
-
105
-
106
-
107
-
108
-
109
-
110
-
111
-
112
-
113
-
114
-
115
-
116
-
117
-
118
-
119
-
120
-
121
-
122
-
123
-
124
-
125
-
126
-
127
-
128
-
129
-
130
-
131
-
132
-
133
-
134
-
135
-
136
-
137
-
138
-
139
-
140
-
141
-
142
-
143
-
144
-
145
-
146
-
147
-
148
-
149
-
150
-
151
-
152
-
153
-
154
-
155
-
156
-
157
-
158
-
159
-
160
-
161
-
162
-
163
-
164
-
165
-
166
-
167
-
168
-
169
-
170
-
171
-
172
-
173
-
174
-
175
-
176
-
177
-
178
-
179
-
180
-
181
-
182
-
183
-
184
-
185
-
186
-
187
-
188
-
189
-
190
-
191
-
192
 |
 |

ENG-10
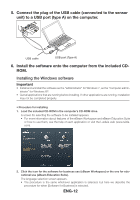
2. Connect the projector to the computer.
The projector can be connected to a computer using the computer cable (supplied with the projec-
tor) or a commercially available HDMI cable.
3. Turn on the projector power and adjust the position and
focus of the projected image.
For the adjustment procedure, see the projector user’s manual.
4. Load the AAA battery in the stylus pen.
Loading the battery
1.
Turn the battery cap counterclockwise and remove it.
Battery cap
2.
Insert the negative side of the battery (AAA) into the battery cap.