NEC VT45 User Manual - Page 14
Introduction - remote control
 |
UPC - 050927234569
View all NEC VT45 manuals
Add to My Manuals
Save this manual to your list of manuals |
Page 14 highlights
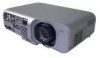
1. INTRODUCTION Introduction to the VT45 Projector This section introduces you to your new VT45 (SVGA) Projector and describes the features and controls. Congratulations on Your Purchase of The VT45 Projector The VT45 is one of the very best projectors available today. The VT45 enables you to project precise images up to 300 inches across (measured diagonally) from your PC or Macintosh computer (desktop or notebook), VCR, DVD player, document camera, or even a laser disc player. You can use the projector on a tabletop or cart, you can use the projector to project images from behind the screen, and the projector can be permanently mounted on a ceiling*1. The remote control can be used wirelessly. Features you'll enjoy: • Simple set up and operation. • Eco Mode, two selectable options (120 watt for Eco 1 and 110 watt for Eco 2) that allow users to reduce the projector's light output, resulting in a doubling (Eco 2) of usable lamp life and decreased lamp replacement costs throughout the projector's life. • A high-performance 130 watt NSH lamp. • Manual horizontal (max 1/3 of widith) and vertical (max 1/ 2 of height) lens shift provides simple imaging positioning. • The lamp life can be extended up to 2000 hours by using the Eco 2 mode. • The supplied wireless remote control that operates the projector from the front side or rear. • Manual zoom control enables you to adjust the image between 25 (0.63 m) and 300 inches (7.6 m) (measured diagonally). • Keystone correction allows you to correct trapezoidal distortion so that the image is square. • Color Management feature includes Gamma Correction, White Balance, and Color Correction that provides natural and true color reproduction. • You can choose between video modes depending on your source: "normal" for a typical picture, "natural" for true color reproduction. • An image can be projected from in front or behind a screen, and the projector can even be installed on the ceiling. • NEC Technologies' exclusive Advanced AccuBlend intelligent pixel blending technology - an extremely accurate image compression technology - offers a crisp image with SXGA (1280 ן1024) resolution*2. • Supports most IBM VGA, SVGA, XGA*2 , SXGA*2, Macintosh, component signal (YCbCr / YPbPr) or any other RGB signals within a horizontal frequency range of 15 to 100 kHz and a vertical frequency range of 50 to 120 Hz. This includes NTSC, PAL, PAL-M, PAL-N, PAL60, SECAM and NTSC4.43 standard video signals. NOTE: Composite video standards are as follows: NTSC: U.S. TV standard for video in U.S. and Canada. PAL: TV standard used in Western Europe. PAL-M: TV standard used in Brazil. PAL-N: TV standard used in Argentina, Paraguay and Uruguay. PAL60: TV standard used for NTSC playback on PAL TVs. SECAM: TV standard used in France and Eastern Europe. NTSC4.43: TV standard used in Middle East countries. • You can use the supplied wireless remote control and remote mouse receiver to operate your PC mouse wirelessly from across the room. The remote mouse receiver supports almost any PC using a USB connection or the supplied USB-to-PS/2 adapter. • You can control the projector with a PC using the PC Control port. • The contemporary cabinet design is light, compact, easy to carry, and complements any office, boardroom or auditorium. *1 Do not attempt to mount the projector on a ceiling yourself. The projector must be installed by qualified technicians in order to ensure proper operation and reduce the risk of bodily injury. In addition, the ceiling must be strong enough to support the projector and the installation must be in accordance with any local building codes. Please consult your dealer for more information. *2 An XGA image (1024ן768) and SXGA image (1280ן1024) are converted into an 800ן600 crisp image with NEC technology's Advanced AccuBlend. Getting Started The fastest way to get started is to take your time and do everything right the first time. Take a few minutes now to review the user's manual. This may save you time later on. At the beginning of each section of the manual you'll find an overview. If the section doesn't apply, you can skip it. E-6
-
 1
1 -
2
-
3
-
4
-
5
-
6
-
7
-
8
-
 9
9 -
 10
10 -
 11
11 -
 12
12 -
 13
13 -
 14
14 -
 15
15 -
 16
16 -
 17
17 -
 18
18 -
 19
19 -
20
-
21
-
22
-
23
-
24
-
25
-
26
-
27
-
28
-
29
-
30
-
31
-
32
-
33
-
34
-
35
-
36
-
37
-
38
-
39
-
40
-
41
-
42
-
43
-
44
-
45
-
46
-
47
-
48
-
49
-
50
-
51
-
52
-
53
-
54
 |
 |
