NaceCare TP18DX HT1800 Heater Owners Manual - Page 3
Parts provided with the heater, Mounting for models TP8X, TP12QX, and TP18SX/DX
 |
View all NaceCare TP18DX manuals
Add to My Manuals
Save this manual to your list of manuals |
Page 3 highlights
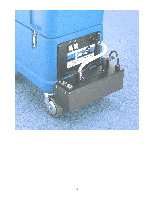
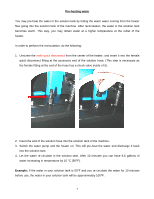
Parts provided with the heater Provided with the heater you find the following parts, necessary to fix the heater on a Santoemma machine: • 2 metal brackets, to mount the heater on the machines with model# TP8X, TP12QX, and TP18SX/DX. • 1 metal bracket, to mount the heater on the machines with model AV12QX, and AV18AX. • 2 6mm lock nuts, to mount the metal brackets to the heater. • 4 screws (M4 x 20mm), used to mount the brackets to the control panel of the machine. The heater is also provided with a solution hose capable of using water at high temperatures. This hose can be used to re-circulate hot water into the solution tank, or it can be used to replace the solution hose of the machine if it is not able to withstand hot water. Mounting for models TP8X, TP12QX, and TP18SX/DX 1. Unscrew the 4 corner screws in each corner of the control panel cover. Mount the 2 metal brackets on the control panel of the machine, using the 4 screws M4x20 provided in the kit. 2. Hang the heater on the 2 brackets, by inserting the screws coming out from the rear side of the heater into the holes of the 2 metal brackets, and tightening them with the 2 6mm lock nuts. See the picture on the next page for reference. 3
-
 1
1 -
 2
2 -
 3
3 -
 4
4 -
 5
5 -
 6
6 -
 7
7 -
 8
8
 |
 |
