Nady 151 VR Manual - Page 4
WHT HANDHELD MICROPHONE TRANSMITTER, Operating Instructions
 |
View all Nady 151 VR manuals
Add to My Manuals
Save this manual to your list of manuals |
Page 4 highlights
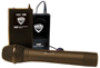
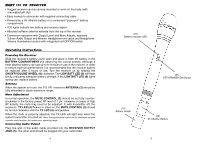
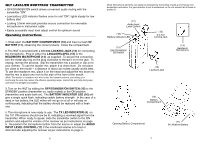
WHT HANDHELD MICROPHONE TRANSMITTER • Features the Nady DM-10D unidirectional neodymium dynamic cartridge for optimum true sound, maximum feedback rejection and minimal handling noise • OFF/STANDBY/ON switch allows convenient audio muting with the transmitter "ON" • Low battery LED indicator flashes once for unit "ON"; lights steady for low battery alert Operating Instructions 1. U n s cwr ethe BATTERY COMPARTMENT COVER (18) and remove, exposing the BATTERY HOLDER (19). Insert a fresh 9V ALKALINE BATTERY (20), observing the correct polarity as marked, and screw the cover back on to the microphone. Make sure the cover is screwed on completely. A fresh alkaline battery can last up to 15 hours in use, but in order to ensure optimum performance, it is recommended that you replace the battery after every 10 hours of use. 2. Turn on the WHT by sliding the OFF/STANDBY/ON SWITCH (21) to the STANDBY position (transmitter on, audio muted) or the ON position (transmitter and audio both on). The BATTERY INDICATOR LED (22) will g i ev a single quick flash, indicating usable battery strength. In the case of a dead or low battery, the LED will either not go on at all or will stay on continuously, indicating that the battery should be replaced with a fresh one. To preserve battery life, turn the transmitter off when not in use. 3. The microphone is now ready to use. The TX LED (4) on the 151 VR receiver should now be lit, indicating a received signal from the transmitter. When ready to speak, slide the transmitter switch to the ON position. Receiver Volume Control Adjust Turn volume control on the 151 VR receiver clockwise to near full gain. Wearing a monitor headset plugged into the receiver's headset jack, speak into the lavalier microphone. Adjust the receiver's volume to a comfortable listening level. Note: Microphone elements can easily be destroyed by the buildup of salts and minerals from perspiration and saliva. It is good practice to put a windscreen on the mic element at all times to protect it. Connecting Headphone to Monitor You can monitor the received signal through headphones to set the transmitter's level trim properly. Any "Walkman" type headset with a mini plug or mini plug adaptor can be used, although the signal may be heard in only one ear unless a stereo-to-mono adapter jack is used. Monitoring through Receiver Plug headphones into HEADPHONE JACK (6) on the receiver. The ON/OFF/VOLUME WHEEL (8) controls volume to the headset. Set the volume to a comfortable level by rotating the VOLUME WHEEL (8). You will be able to hear the received signal to the receiver when the system is operational. This is the monitoring method necessary when adjusting the WLT transmitter's microphone input level per page 6. Monitoring through Camcorder Many camcorders allow the user to monitor by providing a headphone jack. If you plug your headphones into the camcorder, you may need to make a simple adjustment on the 151 VR receiver. If the sound you hear is uncomfortably loud or sounds distorted, turn the OUTPUT LEVEL CONTROL (7) counter-clockwise until good audio quality is obtained. If volume is too low, turn (9) (6) (5) (2) (8) the OUTPUT LEVEL CONTROL (7) clockwise until you obtain comfortable volume. (4) (7) Transmitter Set-Up After completing the above steps, proceed to instructions for operating the Nady transmitter included with your system. (3) (1) (on back) 8 5
-
 1
1 -
 2
2 -
 3
3 -
 4
4 -
 5
5
 |
 |
