Nady DKW-3 HT Manual - Page 3
Operation
 |
View all Nady DKW-3 manuals
Add to My Manuals
Save this manual to your list of manuals |
Page 3 highlights
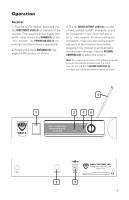
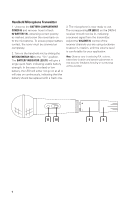
Operation Receiver 1. Plug the AC/DC adapter (provided) into the 9VDC INPUT JACK (3) on the back of the receiver. Then plug the power supply into an AC outlet. Switch the POWER (1) to the "On" position. The POWER ON LED (2) will now light and the receiver is operational. 2. Rotate and extend ANTENNA (4) fully, angled at 60° position as shown. 3. The 1/4" AUDIO OUTPUT JACK (5) provides a fixed, unbalanced MIC level audio output for connection to your mixer with the 1/4" to 1/4" cord supplied. As when making any connection, make sure the mixing board's volume is at the minimum level before plugging in the receiver to avoid possible sound system damage. Use the VOLUME CONTROLS (6) to adjust the volume. Note: this output is the sum of the signals received by both the internal receivers (CH 1 + CH 2). Use the CH 1 & CH 2 VOLUME CONTROLS (6) to adjust the individual relative channel volumes. 4 1 2 76 5 3 3
-
 1
1 -
 2
2 -
 3
3 -
 4
4 -
 5
5 -
 6
6 -
 7
7 -
 8
8
 |
 |
