Nady TCM 1050 Manual - Page 2
Using The Foam Windscreen, Service, Operation, Using The Microphone Shock Mount - vacuum tube condenser
 |
View all Nady TCM 1050 manuals
Add to My Manuals
Save this manual to your list of manuals |
Page 2 highlights
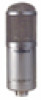
OPERATION The TCM 1050 must be powered by the supplied TMPS-2 power supply and amplified by a microphone pre-amp (such as built into a mixer, or a stand-alone unit). Set-up 1. Connect the TCM 1050 to the TMPS-2 power supply with the XC-7P (7-pin) XLR cable supplied. 2. Connect the TMPS-2 Audio Output to your mixer using a standard balanced 3-pin XLR microphone cable (Note: Before connecting to a mixer directly, turn the channel to which you're connecting to its lowest gain setting, and turn off its phantom power.) 3. Connect the TMPS-2 to the AC power supply (first selecting the proper voltage: 115-230VAC) 4. Turn on the TMPS-2 Power ON/OFF Switch. 5. Slowly turn up the channel gain Controls and Connections in your mixer to the desired A. Audio output for connection to a standard level. balanced 3-pin XLR cable (Note: Make sure to set the mixer to the B. To microphone (use the supplied 7-pin XLR cable: proper gain level - too much gain may XC-7P) distort subsequent amplifiers and too little C. IEC AC cord receptacle (with internal fuse), AC may result in a noisy signal.) power cable supplied 6. Select the polar pattern desired D. 115/230 VAC select switch. (Note: verify setting with the Polar Pattern Select is at the correct voltage supplied or the unit will Switch: omnidirectional, be damaged) cardioid, figure 8, or one of six E. Power ON/OFF switch intermediate stages. F. 9-pattern polar pattern select switch (Note: Experiment with all these choices to fully utilize the versatility the TCM 1050 can offer for various diverse applications.) (Note: For optimum performance, it is best to let the microphone warm up for 5 to 10 minutes so that the internal vacuum tube can reach its peak specifications.) AB F D TMPS-2 C E USING THE MICROPHONE SHOCK MOUNT It is recommended that the TCM 1050 be used with the SSM1050 spider shock mount, which uses an elastic suspension to isolate the microphone from vibration, thereby lowering noise transmitted to the microphone from the stand. This is a useful tool in many situations, such as when the performer is tapping his or her feet, or when there is noise pickup from the rumbling of traffic outside of the building. The disadvantage of using the shock mount is that the weight of the microphone may make it drift in the elastic suspension, so mic placement may take a little longer. To insert the TCM 1050 into the SSM-1050 shock mount, pinch close the levers on the sides of the mount to the open position, then slide the microphone into place. USING THE FOAM WINDSCREEN The FW-1050 foam windscreen is supplied with the TCM 1050. This windscreen fits over the grill portion of the microphone and is designed primarily to decrease bass rumble (from wind noise pickup) during outdoor live or recording use. It is also useful in keeping mouth spray out of the microphone head. The windscreen should be used whenever someone is close miked to both protect the microphone and to also eliminate "popping" sounds from percussive breath sounds. An external stand mount pop filter, such as the Nady MPF-6, is also ideal for this application. (Note: Be aware that the foam windscreen will slightly attenuate the high frequency response of the microphone.) (WARNING: The capsule is the heart of the condenser microphone. If it becomes dirty or wet, the sound will be degraded. Never spray any liquid on the microphone head. Always use a foam windscreen or pop filter if you talk or sing close to the microphone grill screen.) SERVICE (U.S.) Should your Nady microphone require service, please contact the Nady Service Department via phone at (510) 652- 2411 or e-mail at [email protected] (INTERNATIONAL) For service, please contact the Nady distributor in your country through the dealer from whom you pur- chased this product. Do not attempt to service this unit yourself as it will void your warranty Date of purchase Serial Dealer's Name _____ Street _____ City State Zip TCM 1050 SPECIFICATIONS Type True condenser pressure gradient microphone with 1 in (25 mm) diameter dual diaphragms and vacuum tube preamplifier Vacuum tube 6072 (selected from 12AT7) Capsule capacitance 50 pF Polar pattern Omnidirectional, cardioid, figure 8, and six intermediate stages (silent switching) Open circuit sensitivity @1KHz 36dBV +/-2dBV (0dBV=1V/Pa) for all patterns Frequency range 20 to 20,000 Hz Rated output impedance 200 Ohms Recommended load impedance 1000 Ohms Max. SPL (1% THD @1000Hz 134 dB Equivalent noise level (A weighted 18 dB-A S/N ratio re 1Pa 74dB Dynamic range (max SPL to A-weighted noise level 116 dB Ambient temperature range 14˚F to 140˚F (-10 ˚C to +60 ˚C) Relative humidity range 90% (68˚F, 20 ˚C), 85% (140˚F, 60˚C) Connector 7-pin XLR (gold plated) Mic cable ...7-pin XLR cable (XC-7P), 30 ft (10 m) Dimensions Diameter: 2.36 in (60 mm), length: 7.1 in (180 mm) Net weight 29 oz (800 g) Power requirement Dedicated TMPS-2 powering unit (115/230VAC selectable) TMPS-2 Dimensions and Weight 2" X 5.5" X 7" (51 X 140 X 178 mm), 3.25 lbs (1.46 Kg) Specifications and design subject to change without prior notice for improvement purposes 02/01
-
 1
1 -
 2
2
 |
 |
