Nautilus R514c Owners Manual - Page 37
Check RPM Sensor requires shroud
 |
View all Nautilus R514c manuals
Add to My Manuals
Save this manual to your list of manuals |
Page 37 highlights
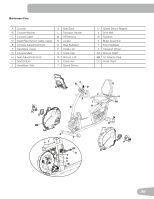
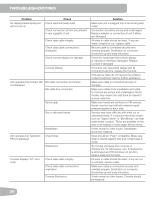
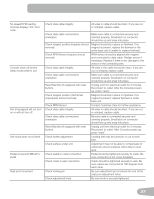
No speed/RPM reading, Console displays "E3" error code Console shuts off (enters sleep mode) while in use Fan (if equipped) will not turn on or will not turn off Unit rocks/does not sit level Pedals loose/unit difficult to pedal Seat post movement Check data cable integrity All wires in cable should be intact. If any are cut or crimped, replace cable. Check data cable connections/ orientation Check magnet position (requires shroud removal) Check RPM Sensor (requires shroud removal) Check data cable integrity Check data cable connections/ orientation Reset Machine (if equipped with reset button) Check magnet position (Technician onlyrequires shroud removal) Check RPM Sensor Check data cable integrity Check data cable connections/ orientation Reset Machine (if equipped with reset button) Check leveler adjustment Check surface under unit Check pedal to crank connection Check crank to axle connection Check locking pin Check adjustment knob Make sure cable is connected securely and oriented properly. Small latch on connector should line up and snap into place. Magnet should be in place on flywheel. If no magnet is present, replace the flywheel or the entire base unit (if unable to replace flywheel). RPM sensor should be aligned with magnet and connected to data cable. Realign sensor if necessary. Replace if there is any damage to the sensor or the connecting wire. All wires in the cable should be intact. If any are cut or crimped, replace cable. Make sure cable is connected securely and oriented properly. Small latch on connector should line up and snap into place. Unplug unit from electrical outlet for 3 minutes. Reconnect to outlet. After the Console powers up, press "reset". Magnet should be in place on flywheel. If no magnet is present, replace flywheel or entire base unit. Contact Customer Care for further assistance. All wires in cable should be intact. If any are cut or crimped, replace cable. Be sure cable is connected securely and oriented properly. Small latch on connector should line up and snap into place. Unplug unit from electrical outlet for 3 minutes. Reconnect to outlet. After Console powers up, press "reset". Leveling feet may be turned in or out to level bike. Adjustment may not be able to compensate for extremely uneven surfaces. Move bike to level area. Pedal should be tightened securely to crank. Be sure connection is not cross-threaded. Crank should be tightened securely to axle. Be sure cranks are connected at 180 degrees from each other. Be sure adjustment pin is locked into one of the seat post adjustment holes Be sure knob is securely tightened. 37
-
 1
1 -
2
-
3
-
4
-
5
-
6
-
7
-
8
-
9
-
10
-
11
-
12
-
13
-
14
-
15
-
16
-
17
-
18
-
19
-
20
-
21
-
22
-
23
-
24
-
25
-
26
-
27
-
28
-
29
-
30
-
31
-
 32
32 -
 33
33 -
 34
34 -
 35
35 -
 36
36 -
 37
37 -
 38
38 -
 39
39 -
 40
40
 |
 |
