Naxa NAM-984 NAM-984 English Manual - Page 3
Operation - connections
 |
View all Naxa NAM-984 manuals
Add to My Manuals
Save this manual to your list of manuals |
Page 3 highlights
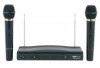
Operation Receiver 1. Plug the power cord into an AC outlet. 2. Switch the Power to "on" 3. Fully extend the Antenna, 60 to 90 Degrees 4. Plug the supplied cord to the "Audio Output Jack) on the unit and connect the other end to a audio mixer or amplifier 5. Please make sure that the volume is set to minimum to avoid possible damage Wireless Microphone Transmitters 1. Unscrew the battery compartment cap and insert a 9V battery, observe correct polarity as marked, and screw the cap back on the microphone. Make sure that the cap is screwed on completely. 2. Turn on the microphones by sliding the On/Off switch to the "ON" Position. The LED light on the microphone and receiver should turn on simultaneously. The wireless microphones are color coded with a red and/or green band as well as the LED light on the wireless microphone, the receiver has "A" (MIC WITH GREEN BAND) AND "B" (MIC WITH RED BAND) LED lights to indicate which microphone is on. 1. Microphone 2. LED indicator light 3. On/off switch 4. Battery cap Page 2
-
 1
1 -
 2
2 -
 3
3
 |
 |
