Naxa NDC-407 English Manual - Page 6
Operation
 |
View all Naxa NDC-407 manuals
Add to My Manuals
Save this manual to your list of manuals |
Page 6 highlights
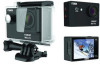
Operation 1. Inserting Micro SD Card Note: Please choose a branded Micro SD card and format it on computer before use. Non-branded cards can not be guaranteed to work normally. 2. Installing and R emoving B atteries A. Press on thebattery door latch to open the battery door. B. Properly insert the appropriate batteries into the camera,as indicated by +/- symbols and directional arrows marked inside the battery door.. C. Battery Gauge: Please refer to diagram. D. Remove Battery: Open the battery door to take the battery out. 3. Charging A. You can charge the product by either connecting it to a computer or with a power adapter. B. You can freely charge the product while traveling with a car charger. C. This product can record video while it is charging. D. This product does not need to be turned on in order to char.ge 4. Turning the C amera on and off A. Press and hold the power button for 3 to 5 seconds to turn it on/off. B. Turn the producton and off by turning thedisplay screen on and off. 5. Mode Switching Switch between video recording / photo shooting / playback / menu by pressing the "Power On-Off" button. 6. How to Record V ideos and Configure Recording Settings • Video Recording Switch to recording mode and there'll be an ( ) in the upper left corner of the screen. Press "OK" to start recording and the ( ) icon in the upper left corner of the screen will start to flash. Press "OK" again if you want to stop and the icon will disappear. 5
-
 1
1 -
 2
2 -
 3
3 -
 4
4 -
 5
5 -
 6
6 -
 7
7 -
 8
8 -
 9
9
 |
 |
