Naxa NPB-256 NPB-256 English Manual - Page 2
Location Of Controls, Power Supply, Battery Operation, Ac Operation
 |
View all Naxa NPB-256 manuals
Add to My Manuals
Save this manual to your list of manuals |
Page 2 highlights
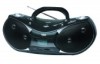
1 67 2 34 1 8 9 10 11 12 13 14 15 17 19 21 23 25 16 18 20 22 24 26 27 28 5 LOCATION OF CONTROLS 1. SPEAKERS 2. USB PORT 3. LCD DISPLAY 4. SD/MMC CARD SLOT 5. AC SOCKET 6. AUX IN JACK 7. FUNCTION SWITCH 8. FM TELESCOPIC ANTENNA 9. CD DOOR 10. HANDLE 11. FM ST. INDICATOR 12. BAND SWITCH 13. MODE BUTTON 14. TUNING CONTROL 15. VOLUME CONTROL 16. USB/CARD BUTTON 17. POWER INDICATOR 18. CD DOOR OPEN BUTTON 19. CD DOOR PUSH CLOSE AREA 20. STOP BUTTON 21. PLAY/PAUSE BUTTON 22. +10/ALBUM BUTTON 23. SKIP/SEARCH DOWN BUTTON 24. EQ/PROGRAM BUTTON 25. SKIP/SEARCH UP BUTTON 26. BATTERY COMPARTMENT 27. AC VOLTAGE SELECTOR (OPTIONAL) 28. MAINS POWER SWITCH (OPTIONAL) POWER SUPPLY q BATTERY OPERATION 1. Remove the battery compartment cover gently. 2. Install 8 x 'C' size batteries (UM-2 or equivalent) taking care that the correct polarities are observed. 3. Replace the battery compartment cover. NOTE: = The AC line cord must be removed for battery operation. = To avoid damage which may result from leaking batteries, remove the batteries when they become weak or when the unit is not to be used for long period of time. q AC OPERATION Insert one end of the AC power cord to the socket located at the rear of the player, and the other end to the wall outlet. NOTE: Please be sure the AC Voltage Selector is switched to your local voltage (for dual voltage version) (optional). 2 3
-
 1
1 -
 2
2 -
 3
3 -
 4
4 -
 5
5
 |
 |
