Netgear DG824M DG824M Reference manual - Page 70
Procedure 5-1, Gateway Upgrade, admin, password, Browse, Upload - firmware download
 |
UPC - 606449025521
View all Netgear DG824M manuals
Add to My Manuals
Save this manual to your list of manuals |
Page 70 highlights
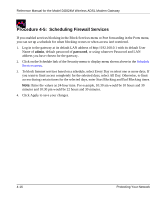
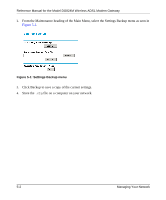
Reference Manual for the Model DG824M Wireless ADSL Modem Gateway Upgrade files can be downloaded from NETGEAR's website. If the upgrade file is compressed (.ZIP file), you must first extract the binary (.BIN or .IMG) file before uploading it to the gateway. Procedure 5-1: Gateway Upgrade Note: NETGEAR recommends that you back up your configuration before doing a firmware upgrade. After the upgrade is complete, you may need to restore your configuration settings. 1. Download and unzip the new software file from NETGEAR. The Web browser used to upload new firmware into the gateway must support HTTP uploads. NETGEAR recommends using Microsoft Internet Explorer 5.0 or Netscape Navigator 4.7 and above. 2. Log in to the gateway at its default LAN address of http://192.168.0.1 with its default User Name of admin, default password of password, or using whatever User Name, Password and LAN address you have chosen for the gateway. 3. From the Main Menu of the browser interface, under the Maintenance heading, select the Gateway Upgrade heading to display the menu shown in Figure 5-2. Figure 5-2: Gateway Upgrade menu 4. In the Gateway Upgrade menu, click the Browse to locate the binary (.BIN or .IMG) upgrade file. 5. Click Upload. Note: When uploading software to the gateway, it is important not to interrupt the Web browser by closing the window, clicking a link, or loading a new page. If the browser is interrupted, it may corrupt the software. When the upload is complete, your gateway will automatically restart. The upgrade process will typically take about one minute. In some cases, you may need to clear the configuration and reconfigure the gateway after upgrading. 5-4 Managing Your Network
-
 1
1 -
2
-
3
-
4
-
5
-
6
-
7
-
8
-
9
-
10
-
11
-
12
-
13
-
14
-
15
-
16
-
17
-
18
-
19
-
20
-
21
-
22
-
23
-
24
-
25
-
26
-
27
-
28
-
29
-
30
-
31
-
32
-
33
-
34
-
35
-
36
-
37
-
38
-
39
-
40
-
41
-
42
-
43
-
44
-
45
-
46
-
47
-
48
-
49
-
50
-
51
-
52
-
53
-
54
-
55
-
56
-
57
-
58
-
59
-
60
-
61
-
62
-
63
-
64
-
 65
65 -
 66
66 -
 67
67 -
 68
68 -
 69
69 -
 70
70 -
 71
71 -
 72
72 -
 73
73 -
 74
74 -
 75
75 -
76
-
77
-
78
-
79
-
80
-
81
-
82
-
83
-
84
-
85
-
86
-
87
-
88
-
89
-
90
-
91
-
92
-
93
-
94
-
95
-
96
-
97
-
98
-
99
-
100
-
101
-
102
-
103
-
104
-
105
-
106
-
107
-
108
-
109
-
110
-
111
-
112
-
113
-
114
-
115
-
116
-
117
-
118
-
119
-
120
-
121
-
122
-
123
-
124
-
125
-
126
-
127
-
128
-
129
-
130
-
131
-
132
-
133
-
134
-
135
-
136
-
137
-
138
-
139
-
140
-
141
-
142
-
143
-
144
-
145
-
146
-
147
-
148
-
149
-
150
-
151
-
152
-
153
-
154
 |
 |
