Netgear DGND3300 DGND3300 User Manual - Page 31
Using Push 'N' Connect (WPS) to Con Your Wireless Network, Shared Key, Apply - setup manual
 |
UPC - 606449060683
View all Netgear DGND3300 manuals
Add to My Manuals
Save this manual to your list of manuals |
Page 31 highlights
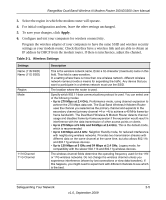
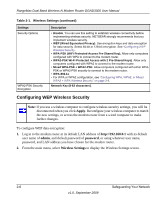
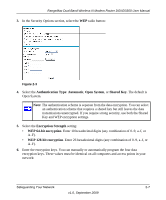
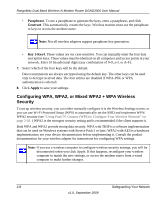
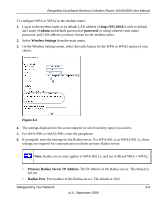
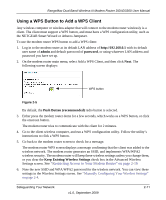
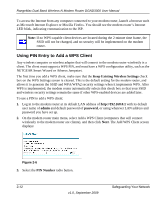
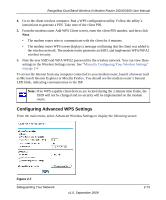
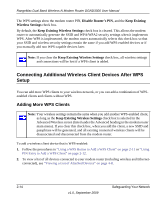
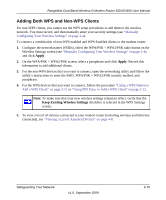
RangeMax Dual Band Wireless-N Modem Router DGND3300 User Manual • Shared Key. This is shared between the wireless access point and the Radius server during authentication. 7. To save your settings, click Apply. Using Push 'N' Connect (WPS) to Configure Your Wireless Network If your wireless clients support Wi-Fi Protected Setup (WPS), you can use this feature to configure the modem router's SSID and security settings and, at the same time, connect the wireless client securely and easily to the modem router. Look for the symbol on your client device (computers that will connect wirelessly to the modem router are clients). WPS automatically configures the network name (SSID) and wireless security settings for the modem router (if the modem router is in its default state) and broadcasts these settings to the wireless client. Note: NETGEAR's Push 'N' Connect feature is based on the Wi-Fi Protected Setup (WPS) standard (for more information, see http://www.wi-fi.org). All other Wi-Ficertified and WPS-capable products should be compatible with NETGEAR products that implement Push 'N' Connect. Some considerations regarding WPS are: • WPS supports only WPA-PSK and WPA2-PSK wireless security. WEP security is not supported by WPS. • If your wireless network will include a combination of WPS capable devices and non-WPS capable devices, NETGEAR suggests that you set up your wireless network and security settings manually first, and use WPS only for adding additional WPS capable devices. See "Adding Both WPS and Non-WPS Clients" on page 2-15. A WPS client can be added using the Push Button method or the PIN method. • Using the Push Button. This is the preferred method. See the following section, "Using a WPS Button to Add a WPS Client. • Entering a PIN. For information about using the PIN method, see "Using PIN Entry to Add a WPS Client" on page 2-12. 2-10 v1.0, September 2009 Safeguarding Your Network
-
 1
1 -
2
-
3
-
4
-
5
-
6
-
7
-
8
-
9
-
10
-
11
-
12
-
13
-
14
-
15
-
16
-
17
-
18
-
19
-
20
-
21
-
22
-
23
-
24
-
25
-
 26
26 -
 27
27 -
 28
28 -
 29
29 -
 30
30 -
 31
31 -
 32
32 -
 33
33 -
 34
34 -
 35
35 -
 36
36 -
37
-
38
-
39
-
40
-
41
-
42
-
43
-
44
-
45
-
46
-
47
-
48
-
49
-
50
-
51
-
52
-
53
-
54
-
55
-
56
-
57
-
58
-
59
-
60
-
61
-
62
-
63
-
64
-
65
-
66
-
67
-
68
-
69
-
70
-
71
-
72
-
73
-
74
-
75
-
76
-
77
-
78
-
79
-
80
-
81
-
82
-
83
-
84
-
85
-
86
-
87
-
88
-
89
-
90
-
91
-
92
-
93
-
94
-
95
-
96
-
97
-
98
-
99
-
100
-
101
-
102
-
103
-
104
-
105
-
106
-
107
-
108
-
109
-
110
-
111
-
112
-
113
-
114
-
115
-
116
-
117
-
118
-
119
-
120
-
121
-
122
-
123
-
124
-
125
-
126
-
127
-
128
-
129
 |
 |
