Netgear EVA9150-100NAS EVA9150 User Manual - Page 19
Completing the Basic Setup Steps, Basic Setup, Connect Wirelessly, Connect using Push 'N' Connect
 |
View all Netgear EVA9150-100NAS manuals
Add to My Manuals
Save this manual to your list of manuals |
Page 19 highlights
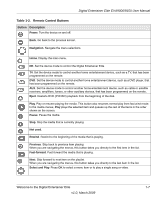
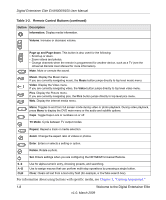
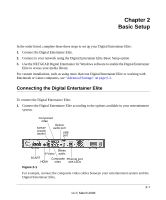
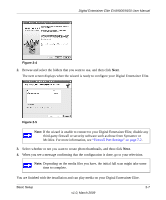
Digital Entertainer Elite EVA9000/9150 User Manual • You might be able to enhance the picture quality by selecting from additional highdefinition video modes in the advanced settings. 8. When prompted, select a language, and press OK. 9. When you hear the audio welcome tune, press OK. If you do not hear the audio welcome message, check your volume settings and the connections to the Digital Entertainer Elite. You will now use the Basic Setup option to finish setting up your Digital Entertainer Elite. Completing the Basic Setup Steps The Basic Setup option enables the Digital Entertainer Elite to use media files that are on Windows PCs or Macintosh computers. If you use Linux or have a complex home network, use the functions described in "Custom Setup and Supervisor Functions" on page 6-1. Follow these steps for the Basic Setup option: 1. After the audio welcome message, select Basic Setup, and then press OK. The Digital Entertainer Elite checks for a network connection. If connected to an Ethernet network that is running DHCP (the usual case for home networks), the Digital Entertainer Elite automatically joins the network. Skip to step 3, "Connect to the Internet. 2. Connect wirelessly (optional). If an Ethernet LAN connection is not found, you can wirelessly connect your Digital Entertainer Elite to the network. Select Connect Wirelessly, and then select one of the following options: - Connect using Push 'N' Connect If your router supports Wi-Fi Protected Setup (WPS) push button automatic configuration, you can add the network name (SSID) and security settings automatically using the Push 'N' Connect feature. Select your network from the list, select OK, and then push the WPS button on your router. Select OK to continue. See your router documentation for more information on WPS support. - Connect Manually The available networks are displayed in a list sorted alphabetically. You might have to scroll to see your network. Select your network from the list, or enter the required network name (SSID) and security settings as needed. Select the network that provides 5 Ghz connection for maximum bandwidth, if available. Basic Setup 2-3 v1.0, March 2009
-
 1
1 -
2
-
3
-
4
-
5
-
6
-
7
-
8
-
9
-
10
-
11
-
12
-
13
-
 14
14 -
 15
15 -
 16
16 -
 17
17 -
 18
18 -
 19
19 -
 20
20 -
 21
21 -
 22
22 -
 23
23 -
 24
24 -
25
-
26
-
27
-
28
-
29
-
30
-
31
-
32
-
33
-
34
-
35
-
36
-
37
-
38
-
39
-
40
-
41
-
42
-
43
-
44
-
45
-
46
-
47
-
48
-
49
-
50
-
51
-
52
-
53
-
54
-
55
-
56
-
57
-
58
-
59
-
60
-
61
-
62
-
63
-
64
-
65
-
66
-
67
-
68
-
69
-
70
-
71
-
72
-
73
-
74
-
75
-
76
-
77
-
78
-
79
-
80
-
81
-
82
-
83
-
84
-
85
-
86
-
87
-
88
-
89
-
90
-
91
-
92
-
93
-
94
-
95
-
96
-
97
-
98
-
99
-
100
-
101
-
102
-
103
-
104
 |
 |