Netgear EX6200 Learn more about your EX6200 - Page 11
Launch the NETGEAR USB Control Center., Install the ReadySHARE Printer utility. - setup
 |
View all Netgear EX6200 manuals
Add to My Manuals
Save this manual to your list of manuals |
Page 11 highlights
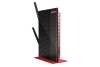
2. Connect your printer's USB cable to the extender's USB port. USB 3.0 port 3. Visit www.netgear.com/readyshare and download the ReadySHARE Printer utility for Windows or Mac. 4. Install the ReadySHARE Printer utility. After you install it, the utility displays as NETGEAR USB Control Center on your computer. 5. Launch the NETGEAR USB Control Center. A list of available printers displays. If this is the first time you are running the utility, you are asked to select a default printer. 6. Select a printer and click the Connect button. Whenever you want to print, open the NETGEAR USB Control Center and make sure your printer status says available. To print from other devices, repeat this setup process for each of them. 11
-
 1
1 -
2
-
3
-
4
-
5
-
 6
6 -
 7
7 -
 8
8 -
 9
9 -
 10
10 -
 11
11 -
 12
12 -
 13
13 -
 14
14 -
 15
15 -
 16
16 -
17
-
18
-
19
-
20
 |
 |

11
2.
Connect your printer’s USB cable to the extender’s USB port.
3.
Visit
www.netgear.com/readyshare
and download the ReadySHARE
Printer utility for Windows or Mac.
4.
Install the ReadySHARE Printer utility.
After you install it, the utility displays as NETGEAR USB Control
Center on your computer.
5.
Launch the NETGEAR USB Control Center.
A list of available printers displays. If this is the first time you are
running the utility, you are asked to select a default printer.
6.
Select a printer and click the
Connect
button.
Whenever you want to print, open the NETGEAR USB Control
Center and make sure your printer status says available. To print
from other devices, repeat this setup process for each of them.
USB 3.0 port