Netgear EX6200 Installation Guide
Netgear EX6200 Manual
 |
View all Netgear EX6200 manuals
Add to My Manuals
Save this manual to your list of manuals |
Netgear EX6200 manual content summary:
- Netgear EX6200 | Installation Guide - Page 1
Started EX6200 WiFi Range Extender AC1200 High Power Dual Band Gigabit Ports Installation Guide Does your WiFi router have a WPS button? Wi-Fi Protected Setup (WPS) is an easy way to connect WiFi devices. The button might look like one of these: Yes 1. Attach the antennas. Attach the antennas to - Netgear EX6200 | Installation Guide - Page 2
Hardware Front panel EX6200 WiFi Range Extender AC1200 High Power Dual Band Gigabit Ports Installation Guide Rear panel 5 dBi external antennas 2.4 GHz Link Rate LED 5 GHz Link Rate LED Device to Extender LED LAN LEDs USB LED USB 3.0 port WPS button Reset button Power input LAN ports Power
-
 1
1 -
 2
2
 |
 |

Getting Started
EX6200 WiFi Range Extender
AC1200 High Power Dual Band Gigabit Ports
Installation Guide
3. Connect to your WiFi router.
Press the
WPS
button on the extender. The Link Rate LEDs and Device to
Extender LED blink green. Within two minutes, press the
WPS
button on your
WiFi router. After a few seconds, the 2.4 GHZ Link Rate LED lights green,
indicating a good connection between your WiFi router and your extender.
If the 2.4 GHz Link Rate LED does not light, or the LED is blinking amber, try
again. If the LED still do not light, follow the instructions for No WPS button on
the right.
4. Add a WiFi band.
If your WiFi router supports the 5 GHz band (not all routers do), and you want to
extend that band, repeat Step 2 and check that the 5 GHz Link Rate LED lights
green to confirm the connection.
6. Connect your WiFi devices.
Take your WiFi device to the location with poor WiFi router coverage. Find the
new extender network name:
Existing network name:
MyNetworkName
New extended network name:
MyNetworkName
_2GEXT
or
MyNetworkName
_5GEXT
Select the new network and use your WiFi router password to connect. You
are now using your extended WiFi network.
5. Choose a location and check the signal strength.
Now that the extender is connected to your WiFi router, you can move it to a
location that will boost your WiFi range. The location you choose must be
within the range of your existing WiFi router network. Plug the extender into
an electrical outlet.
The Link Rate LEDs help you choose a spot where the extender-to-router
connection is optimal. See the Indicator LEDs section on the back to learn how
the LEDs show the best connection. If you get no connection or a poor
connection, move the extender closer to your WiFi router and try again until
the 2.4 GHz or 5 GHz Link Rate LED lights green.
Yes
No (or not sure)
3. Connect to the extender.
On a computer, tablet, or smartphone, open the WiFi connection manager and
connect to the extender network called
NETGEAR_EXT
. When you are
connected to the extender, the Device to Extender LED lights solid green.
4. Set up with NETGEAR genie.
Open a web browser. You are automatically taken to NETGEAR genie®, which
guides you through the following steps.
Note
: If you are not automatically directed to NETGEAR genie, go to
www.mywifiext.net
.
If a login screen displays,
enter
admin
for the user name
and
password
for the password.
a.
Select your existing WiFi router’s network.
b.
Enter your password for your WiFi router’s network.
c.
Choose a name for the extender WiFi network.
You can accept the default network name (MyNetworkName_EXT) or
rename the network.
6. Connect your WiFi devices.
Take your WiFi device to the location with poor WiFi router coverage. Find the
new extender network name:
Existing network name:
MyNetworkName
New extended network name:
MyNetworkName
_2GEXT
or
MyNetworkName
_5GEXT
Select the new network and use your WiFi router password to connect. You
are now using your extended WiFi network.
Does your WiFi router have a WPS button?
2. Turn on your extender.
Place the extender close to your WiFi router. Plug the extender into an
electrical outlet. Press the
Power
button if necessary.
Wi-Fi Protected Setup (WPS) is an easy way to connect WiFi devices. The button might look like one of these:
5. Choose a location and check the signal strength.
Now that the extender is connected to your WiFi router, you can move it to a
location that will boost your WiFi range. The location you choose must be
within the range of your existing WiFi router network. Plug the extender into
an electrical outlet.
The Link Rate LEDs help you choose a spot where the extender-to-router
connection is optimal. See the Indicator LEDs section on the back to learn how
the LEDs show the best connection. If you get no connection or a poor
connection, move the extender closer to your WiFi router and try again until
the 2.4 GHz or 5 GHz Link Rate LED lights green.
2. Turn on your extender.
Place the extender close to your WiFi router. Plug the extender into an
electrical outlet. Press the
Power
button if necessary.
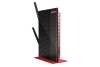
1. Attach the antennas.
Attach the antennas to the antenna connector by turning the antennas
clockwise. Bend and rotate the antennas into position. Double check that the
antennas are properly tightened.
1. Attach the antennas.
Attach the antennas to the antenna connector by turning the antennas
clockwise. Bend and rotate the antennas into position. Double check that the
antennas are properly tightened.