Netgear FS309T FS309T Installation Guide - Page 1
Netgear FS309T - Switch Manual
 |
UPC - 606449022926
View all Netgear FS309T manuals
Add to My Manuals
Save this manual to your list of manuals |
Page 1 highlights
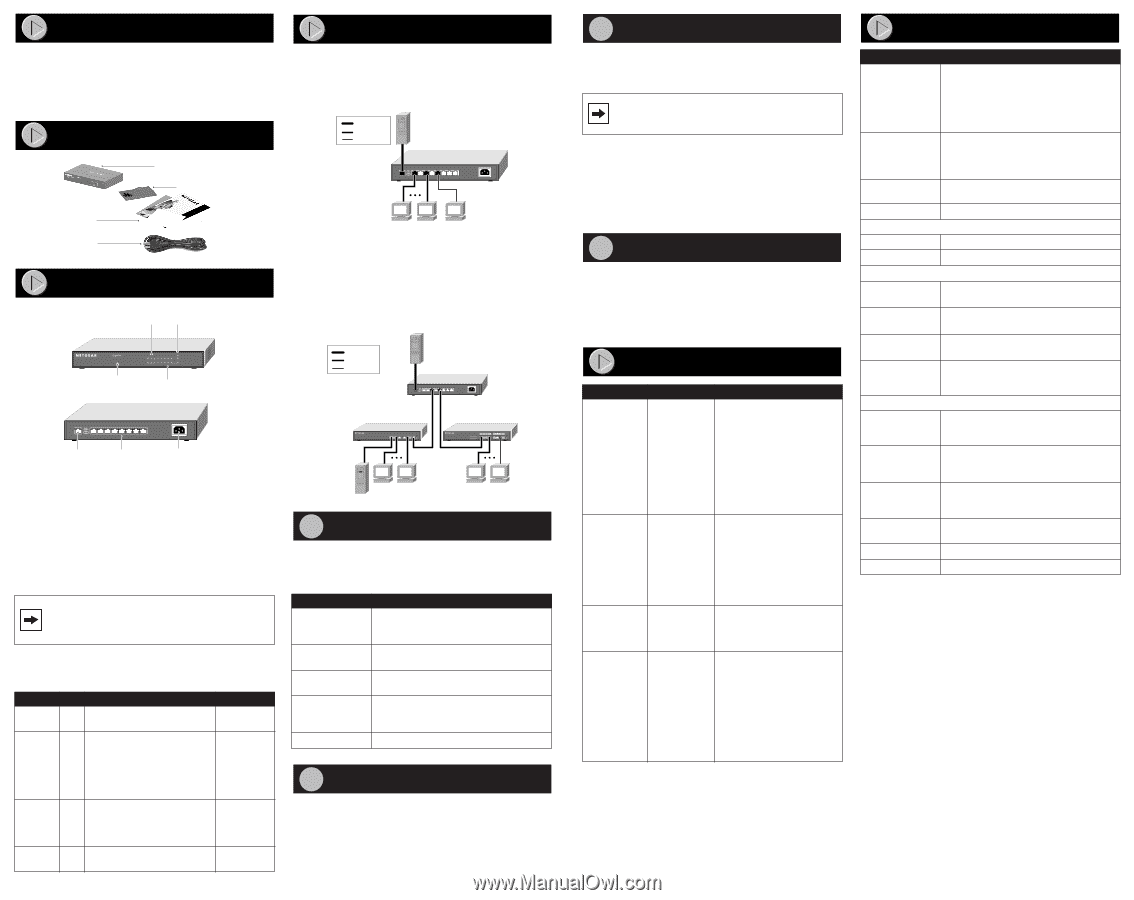
Introduction Applications The NETGEAR® Model FS309T Fast Ethernet Switch provides you with a low-cost, high-performance network solution and is designed to support power workgroups operating at either 10 megabits per second (Mbps) or 100 Mbps, and can relieve server and backbone bottlenecks with one copper Gigabit Ethernet port. Verify Package Contents Desktop Switching The Model FS309T switch, used as a desktop switch to build a small network that enables users to have Gigabit (1000 Mbps) access to a server. Key 1000 Mbps 100 Mbps 10 Mbps Server with Model GA302T Gigabit Card Model FS309T Switch Model FS309T Fast Ethernet Switch Installation Hardware 9 8 7 6 5 4 3 2 1 100-240VAC, 50-60Hz Installation Guide, Warranty & Registration Card and Support Information Card Power code (for switch) Product Illustration Front Panel of the Model FS309T Switch 10M/100M Link, Activity LED 1000M Link, Activity LED 10/100Mbps Fast Ethernet Switch with Gigabit Port Ethernet PWR 1000M GREEN = 100M, YELLOW = 10M, BLINKING = ACT 1 2 3 4 5 6 7 8 9 GREEN = FDX, YELLOW = COL MODELFS309T Power LED FDX LED Collision LED Rear Panel of the Model FS309T Switch 9 8 7 6 5 4 3 2 1 Gigabit Port 10/100M Port 100-240VAC, 50-60Hz Power Socket 9462FA 9607FA Segment Switching The Model FS309T switch can segment a network into multiple connected pieces, increasing overall bandwidth and throughput. The Model FS309T switch segmenting networks that are built with a NETGEAR Model FE508 Fast Ethernet Hub and a NETGEAR Model DS516 Dual Speed Hub. Key 1000 Mbps 100 Mbps 10 Mbps Server with Model GA302T Gigabit Card Model FS309T Switch 9 8 7 6 5 4 3 2 1 100-240VAC, 50-60Hz Model FE508 Fast Ethernet Hub Model DS516 Dual Speed Hub Auto Uplink™ The Auto Uplink technology that NETGEAR has included in this product will automatically sense whether the straight-through cable plugged into any port should have a 'normal' connection, e.g. connecting to a PC; or an 'uplink' connection, e.g. connecting to a router, switch, or hub. That port will then configure itself to the correct configuration. This feature also eliminates the need to worry about crossover cables, as Auto Uplink will accommodate either type of cable to make the right connection. Note: Auto Uplink will compensate for setting uplink connections, and crossover or straight-through cables. Using Auto Uplink to create multiple paths between any two network devices will disable your network. LEDs This table describes the activity of the Model FS309T switch LEDs. Label Activity Description Color PWR On The Switch is receiving power Green Off The Switch is NOT receiving power 100M/10M On Indicates Link or Activity at 10 Mbps or 100 Mbps • 100 Mbps speed Link • 100 Mbps speed Activity • 10 Mbps speed Link • 10 Mbps speed Activity GREEN GREEN-Blinking YELLOW YELLOW-Blinking 1000M On Indicates Link or Activity at 1000 Mbps • 1000 Mbps speed Link • 1000 Mbps speed Activity GREEN GREEN-Blinking FDX/COL On Full Duplex Collision GREEN YELLOW-Blinking 9608FA 1 Preparing the Site Before you begin installing your switch, prepare the installation site. Make sure that your operating environment meets the operating environment requirements of the equipment. Characteristic Temperature Operating humidity Ventilation Operating conditions Power Requirement Ambient temperature between 0 and 40 C (32 and 104 F). No nearby heat sources such as direct sunlight, warm air exhausts, or heaters. Maximum relative humidity of 90%, noncondensing. Minimum 2 inches (5.08 cm) on all sides for cooling. Adequate airflow in room or wiring closet. At least 6 feet (1.83 m) to nearest source of electromagnetic noise (such as photocopy machine). Adequate power source within 6 feet (1.83 m). 2 Installing the Switch Set the switch up on a flat surface; you do not need any special tools. Be sure the switch is positioned with at least 2 inches of space on all sides for ventilation. 3 Connecting Devices To connect devices to the switch: 1. Connect the devices to the 10/100 Mbps ports on the switch, using Category 5 UTP cable and an RJ-45 plug. Note: Ethernet specifications limit the cable length between your PC or server and the switch to 328 feet (100 meters) 2. Connect one end of the Category 5 UTP cable to the Gigabit port and the other end to the linking server or network device. 3. Connect one end of the AC power cord to the power receptacle on the rear panel of the switch and the other end of the AC power cord to the wall outlet. 4 Verifying Installation When power has been applied to the switch: • The green Pwr (power) LED on the front panel is on. When the switch is connected and operating, refer to the table in "LEDs" for information about the LEDs and their activity. Troubleshooting Information Symptom Cause Solution Power LED is off. No power is received at the hub. Check the power cord connections for the switch and the connected device. Check for a defective adapter card, cable, or port by testing them in an alternate environment where all products are functioning. Make sure all cables used are correct and comply with Ethernet specifications. Either 10M, Port connection 100M, or 1000M is not Link LED is off functioning. Check the crimp on the RJ-45 connectors, and make sure that the plug is properly inserted and locked into the port at both the switch and the connecting device. Make sure all cables used are correct and comply with Ethernet specifications. One or more components are malfunctioning. Not all system Test the components in an components are alternate environment where all properly installed. other components are functioning properly. A segment or device is not recognized as part of the network. One or more devices are not properly connected or cabling does not meet Ethernet guidelines. Verify that the cabling is correct. Be sure all cable connectors are securely positioned in the required ports. Straight-through cables should be used for all standard twisted pair connections. Make sure all devices are connected to the network. Equipment may have been accidentally disconnected. Technical Specifications Type Specification Standards Compatibility ISO/IEC 802-3 (ANSI/IEEE 802.3i) 10BASE-T Ethernet IEEE 802.3u,100BASE-TX Fast Ethernet IEEE 802.3ab, 1000BASE-T Gigabit Ethernet compatible with major network software, including Windows® networking, NetWare, and Linux Data Rate 100 Mbps with 4B/5B encoding and MLT-3 physical interface for 100BASE-TX 10 or 100 or 1000 Mbps half-duplex 20 or 200 or 2000 Mbps full-duplex Network Interface RJ-45 connector for 10BASE-T or 100BASE-TX or 1000BASE-T Ethernet interface Power 3.7 w max Physical Specifications Dimensions: 25.3 x 3.5 x 18.0 cm Weight: 2.86 lb; 1.30 kg Environmental Specifications Operating temperature: 0 to 40° C (32 to 104° F) Operating humidity: 90% maximum relative humidity, noncondensing Electromagnetic Compliance CE mark, commercial; FCC Part 15, Class A; EN 55 022 (CISPR 22), C-Tick, VCCI A Safety Agency Approvals for the Power Adapter CE mark, Commercial UL listed (UL 1950) Performance Specifications Frame filter rate: 14,800 frames/sec max for 10M port 148,000 frames/sec max for 100M port 1,480,000 frames/sec max for 1000M port Frame forward rate: 14,800 frames/sec max for 10M port 148,000 frames/sec max for 100M port 1,480,000 frames/sec max for 1000M port Network latency (using 64-byte packets): 100 Mbps to 100 Mbps: 9.5 µs max 100 Mbps to 1000 Mbps: 8.5 µs max 1000 Mbps to 100 Mbps: 3.2 µs max Address database size: 4000 MAC addresses Addressing: 48-bit MAC address Queue buffer: 128 kilobytes
-
 1
1 -
 2
2
 |
 |