Netgear FVS318G FVS318G Installation Guide - Page 2
Troubleshooting Tips, Technical Support - reference manual
 |
UPC - 606449064827
View all Netgear FVS318G manuals
Add to My Manuals
Save this manual to your list of manuals |
Page 2 highlights
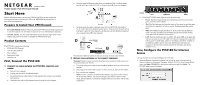
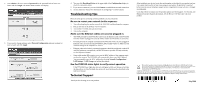
2. Enter admin as the user name and password for the password both in lower case letters and click Login. The Router Status window will display. 3. If you need to change settings, select Network Configuration and enter settings for your network and click Apply. 4. You can click Broadband Status in the upper right of the Configuration display to check the connection status. 5. If you are not connected, you can click Connect to establish the network connection. 6. See the Reference Manual for information on configuring FVS318G features. Troubleshooting Tips Here are some tips for correcting common problems you may encounter. Be sure to restart your network in this sequence: 1. Turn off and unplug the modem, turn off the FVS318G, and shut down the computer. 2. Plug in and turn on the modem, wait two minutes. 3. Turn on the FVS318G and wait one minute. 4. Turn on the computer. Make sure the Ethernet cables are securely plugged in. • The WAN port LED on the FVS318G will be on if the Ethernet cable to the FVS318G from the modem is plugged in securely and the modem and FVS318G are turned on. • For each powered on computer connected to the FVS318G with a securely plugged in Ethernet cable, the corresponding FVS318G LAN port LED will be on. Make sure the network settings of the computer are correct. • Ethernet cable and wirelessly connected computers should be configured to obtain IP and DNS addresses automatically via DHCP whenever possible. For help with this, see the Reference Manual. • Some cable modem ISPs require you to use the MAC address of the computer registered on the account. The FVS318G will automatically detect your MAC address. You can manually enter the MAC address by selecting Network Configuration > LAN Settings > LAN Groups and editing the address. Use the FVS318G status lights to verify correct operation. If the FVS318G Power light does not turn solid green within two minutes of turning the firewall on, or if the Test light does not go off, reset the firewall as described in the Reference Manual. Technical Support Thank you for selecting NETEAR products. After installing your device, locate the serial number on the label of your product and use it to register your product at http://www.netgear.com/register. Registration is required before you can use our telephone support service. Registration via our web site is strongly recommended. Go to http://kbserver.netgear.com for product updates and Web support. For Warranty and Regional Customer Support information, see the Resource CD that came with your product. This symbol was placed in accordance with the European Union Directive 2002/96 on the Waste Electrical and Electronic Equipment (the WEEE Directive). If disposed of within the European Union, this product should be treated and recycled in accordance with the laws of your jurisdiction implementing the WEEE Directive. © 2009 by NETGEAR, Inc. All rights reserved. NETGEAR and the NETGEAR logo are registered trademarks of NETGEAR, Inc. in the United States and/or other countries. Other brand and product names are trademarks or registered trademarks of their respective holders. Information is subject to change without notice. July 2009
-
 1
1 -
 2
2
 |
 |
