Netgear FVX538v2 Configuring a Hub-and-Spoke VPN Using the NETGEAR VPN Client
Netgear FVX538v2 - ProSafe VPN Firewall Dual WAN Manual
 |
View all Netgear FVX538v2 manuals
Add to My Manuals
Save this manual to your list of manuals |
Netgear FVX538v2 manual content summary:
- Netgear FVX538v2 | Configuring a Hub-and-Spoke VPN Using the NETGEAR VPN Client - Page 1
FVX538 #1 and FVX538 #2. By establishing a VPN connection to the FVX538#1, the software VPN client gains access to Local Area Network #2 behind FVX538 #2 through FVX538 #1. Procedure This procedure was developed and tested using: • NETGEAR FVX538 ProSafe VPN Firewall with version 2.x firmware - Netgear FVX538v2 | Configuring a Hub-and-Spoke VPN Using the NETGEAR VPN Client - Page 2
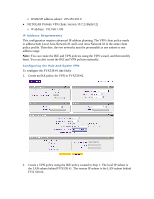
IP address subnet: 255.255.255.0 • NETGEAR ProSafe VPN client, version 10.7.2 (Build 12) o IP address: also create the IKE and VPN policies manually. Configuring the Hub-and-Spoke VPN To configure the FVX538 #1 (the Hub): 1. Create an IKE policy for VPN to FVX538 #2. 2. Create a VPN policy using - Netgear FVX538v2 | Configuring a Hub-and-Spoke VPN Using the NETGEAR VPN Client - Page 3
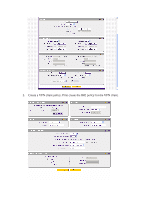
3. Create a VPN client policy. First create the IKE policy for the VPN client. - Netgear FVX538v2 | Configuring a Hub-and-Spoke VPN Using the NETGEAR VPN Client - Page 4
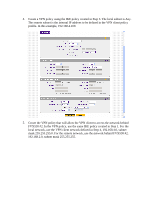
VPN client policy profile. In this example, 192.168.4.100. 5. Create the VPN policy that will allow the VPN client to access the network behind FVX538 #2. In the VPN policy, use the same IKE policy created in Step 1. For the local network, use the VPN client network defined in Step 4, 192 - Netgear FVX538v2 | Configuring a Hub-and-Spoke VPN Using the NETGEAR VPN Client - Page 5
168.4.0, subnet mask 255.255.255.0. Configuring the VPN Client Software To configure the VPN client software: 1. To create a new connection, under Remote Party Identity and Addressing, define an object to cover both LANs behind FVX538 #1 and FVX538 #2. In this case, select IP Address Range as the ID - Netgear FVX538v2 | Configuring a Hub-and-Spoke VPN Using the NETGEAR VPN Client - Page 6
. A pop-up window appears showing an "attempting to connect" message. Eventually the message will show that there is a successful connection to the FVX538. 3. From the command prompt, ping both the subnets behind FVX538 #1 and FVX538 #2. Conclusion If user wants to configure two remote locations
-
 1
1 -
 2
2 -
 3
3 -
 4
4 -
 5
5 -
 6
6
 |
 |

Application Note
Configuring a Hub-and-Spoke VPN Using the NETGEAR
VPN Client
Summary
A Hub-and-Spoke VPN allows multiple sites to communicate through a central hub site.
This application note describes how to configure a Hub-and-Spoke VPN when one of the
spokes is the NETGEAR VPN client. It has been tested with the FVX538 router,
firmware version 2.x and NETGEAR ProSafe® VPN client, version 10.7.2 (Build 12).
Note:
See Hub-and-Spoke VPN for general instructions on configuration that does not
use the VPN Client.
In this configuration, there is a gateway-to-gateway VPN tunnel between FVX538 #1 and
FVX538 #2. By establishing a VPN connection to the FVX538#1, the software VPN
client gains access to Local Area Network #2 behind FVX538 #2 through FVX538 #1.
Procedure
This procedure was developed and tested using:
•
NETGEAR FVX538 ProSafe VPN Firewall with version 2.x firmware
o
WAN1 (10.1.1.2 ) IP address: 192.168.1.0
o
WAN1 IP address subnet:
255.255.255.0
o
WAN2 (10.1.2.2)
IP address: 192.168.2.0