Netgear FWG114P FWG114Pv2 Reference Manual - Page 98
For Windows XP and 2000, Use TCP/IP LPR Printing, and run the Windows Add Printer Wizard.
 |
UPC - 606449029819
View all Netgear FWG114P manuals
Add to My Manuals
Save this manual to your list of manuals |
Page 98 highlights
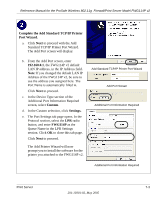
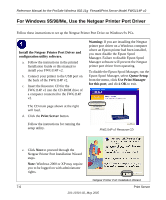
Reference Manual for the ProSafe Wireless 802.11g Firewall/Print Server Model FWG114P v2 For Windows XP and 2000, Use TCP/IP LPR Printing Follow these instructions to set up TCP/IP printing on your Windows XP and 2000 PCs. Install the FWG114P v2, connect your printer to the USB port on the FWG114P v2, and run the Windows Add Printer Wizard. a. Follow the instructions in the printed Installation Guide or this manual to install your FWG114P v2. Connect your printer to the USB port on the back of the FWG114P v2. b. From the Windows Start menu of a computer connected to the FWG114P v2, click Printers and Faxes. c. Click Add a printer. Click Next to proceed. d. Be sure to choose the Local printer attached to this computer option. Click Next to proceed. e. On the Select a Printer Port screen, be sure to choose the Create a new port: option. From the Type of port: drop-down list, be sure to select Standard TCP/IP Port. Click Next to proceed. This will start the Add Standard TCP/IP Printer Port Wizard. Add Printer Wizard Local or Network Printer screen Select a Printer Port screen 7-2 Print Server 201-10301-02, May 2005
-
 1
1 -
2
-
3
-
4
-
5
-
6
-
7
-
8
-
9
-
10
-
11
-
12
-
13
-
14
-
15
-
16
-
17
-
18
-
19
-
20
-
21
-
22
-
23
-
24
-
25
-
26
-
27
-
28
-
29
-
30
-
31
-
32
-
33
-
34
-
35
-
36
-
37
-
38
-
39
-
40
-
41
-
42
-
43
-
44
-
45
-
46
-
47
-
48
-
49
-
50
-
51
-
52
-
53
-
54
-
55
-
56
-
57
-
58
-
59
-
60
-
61
-
62
-
63
-
64
-
65
-
66
-
67
-
68
-
69
-
70
-
71
-
72
-
73
-
74
-
75
-
76
-
77
-
78
-
79
-
80
-
81
-
82
-
83
-
84
-
85
-
86
-
87
-
88
-
89
-
90
-
91
-
92
-
 93
93 -
 94
94 -
 95
95 -
 96
96 -
 97
97 -
 98
98 -
 99
99 -
 100
100 -
 101
101 -
 102
102 -
 103
103 -
104
-
105
-
106
-
107
-
108
-
109
-
110
-
111
-
112
-
113
-
114
-
115
-
116
-
117
-
118
-
119
-
120
-
121
-
122
-
123
-
124
-
125
-
126
-
127
-
128
-
129
-
130
-
131
-
132
-
133
-
134
-
135
-
136
-
137
-
138
-
139
-
140
-
141
-
142
-
143
-
144
-
145
-
146
-
147
-
148
-
149
-
150
-
151
-
152
-
153
-
154
-
155
-
156
-
157
-
158
-
159
-
160
-
161
-
162
-
163
-
164
-
165
-
166
-
167
-
168
-
169
-
170
-
171
-
172
-
173
-
174
-
175
-
176
-
177
-
178
-
179
-
180
-
181
-
182
-
183
-
184
-
185
-
186
-
187
-
188
-
189
-
190
-
191
-
192
-
193
-
194
-
195
-
196
-
197
-
198
-
199
-
200
-
201
-
202
-
203
-
204
-
205
-
206
-
207
-
208
-
209
-
210
-
211
-
212
-
213
-
214
-
215
-
216
-
217
-
218
-
219
-
220
-
221
-
222
-
223
-
224
-
225
-
226
-
227
-
228
-
229
-
230
-
231
-
232
-
233
-
234
-
235
-
236
-
237
-
238
-
239
-
240
-
241
-
242
-
243
-
244
-
245
-
246
-
247
-
248
-
249
-
250
-
251
-
252
-
253
-
254
-
255
-
256
-
257
-
258
-
259
-
260
-
261
-
262
-
263
-
264
-
265
-
266
-
267
-
268
-
269
-
270
-
271
-
272
-
273
-
274
-
275
-
276
-
277
-
278
-
279
-
280
-
281
-
282
-
283
-
284
-
285
-
286
-
287
-
288
-
289
-
290
-
291
-
292
-
293
-
294
-
295
-
296
 |
 |
