Netgear GS728TXS GS728TXS Installation Guide - Page 1
Netgear GS728TXS Manual
 |
View all Netgear GS728TXS manuals
Add to My Manuals
Save this manual to your list of manuals |
Page 1 highlights
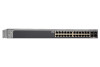
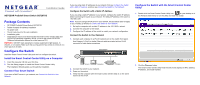
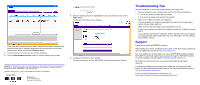
Installation Guide NETGEAR ProSafe® Smart Switch GS728TXS Package Contents • NETGEAR ProSafe® Smart Switch GS728TXS • Rubber footpads for tabletop installation • AC power cord • 19-inch rack-mount kit for rack installation • Installation guide • Smart Switch resource CD that includes the Smart Control Center Utility and GS728TXS Hardware Installation Guide. (A link to the online GS728TXS Software Administration Manual is on the resource CD.) WARNING: DO NOT stack equipment, or place equipment in tight spaces, in drawers, or on carpets. Make sure that your equipment has at least 2 inches (5 cm) of air space on all sides. Configure the Switch Install the Smart Control Center Utility and use it to configure the switch. Install the Smart Control Center Utility on a Computer 1. Insert the resource CD into your CD drive. 2. Run the Setup program to install the Smart Control Center Utility. The Installation Wizard guides you through the installation. Connect Your Smart Switch If you have a DHCP server in you network, see Connect the Switch to Your Network. If you are using static IP addresses in you network, first see Configure the Switch with a Static IP Address, and then see Connect the Switch to Your Network. Configure the Switch with a Static IP Address If you are using a static IP address in you network, configure the switch IP address before connecting the switch to your network. The default IP address of the switch is 192.168.0.239. Note: If you are using a DHCP server in your network, this procedure does not apply to you; instead, go directly to Connect the Switch to Your Network. 1. Set up the computer with a static IP address in the 192.168.0.x subnet. 2. Connect the computer to the switch. 3. Configure the IP address of the switch to match your network configuration. Connect the Switch to Your Network 1. Connect each computer to an RJ-45 network port on the switch front panel. Use Category 5 (Cat 5) or better Ethernet cable terminated with an RJ-45 connector to make these connections. Smart Switch INTERNET Servers Computers Printers 2. Connect the switch to your network. 3. Power on the switch. 4. Verify that the computer with the Smart Control Center Utility is on the same subnet as the switch. Configure the Switch with the Smart Control Center Utility 1. Double-click the Smart Control Center Utility icon on your desktop or in the Windows Start menu to run the utility and view this screen. 2. Click the Discover button. The Smart Control Center Utility finds the switch and displays its MAC address, IP address, and model number.
-
 1
1 -
 2
2
 |
 |