Netgear M5300-52G Hardware Installation Guide - Page 20
Connect a Console to the Switch
 |
View all Netgear M5300-52G manuals
Add to My Manuals
Save this manual to your list of manuals |
Page 20 highlights
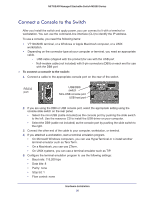
NETGEAR Managed Stackable Switch M5300 Series Connect a Console to the Switch After you install the switch and apply power, you can connect to it with a terminal or workstation. You can use the command-line interface (CLI) to identify the IP address. To use a console, you need the following items: • VT100/ANSI terminal, or a Windows or Apple Macintosh computer, or a UNIX workstation. • Depending on the connector type at your computer or terminal, you need an appropriate cable. - USB cable (shipped with the product) for use with the USB port - Null-modem cable (not included) with 9-pin connectors (DB9) on each end for use with the DB9 port To connect a console to the switch: 1. Connect a cable to the appropriate console port on the rear of the switch. RS232 port USB/DB9 switch Mini-USB console port USB host port 2. If you are using the DB9 or USB console port, select the appropriate setting using the console slide switch on the rear panel. • Select the mini-USB (cable included) as the console port by pushing the slide switch to the left. Use the resource CD to install the USB driver on your computer. • Select the DB9 (cable not included) as the console port by pushing the slide switch to the right. 3. Connect the other end of the cable to your computer, workstation, or terminal. 4. If you attached a workstation, start a terminal emulation program. • On Microsoft Windows computers, you can use HyperTerminal or o install another terminal emulator such as Tera Term. • On a Macintosh, you can use ZTerm. • On UNIX systems, you can use a terminal emulator such as TIP. 5. Configure the terminal emulation program to use the following settings: • Baud rate: 115,200 bps • Data bits: 8 • Parity: none • Stop bit: 1 • Flow control: none Hardware Installation 20
-
 1
1 -
2
-
3
-
4
-
5
-
6
-
7
-
8
-
9
-
10
-
11
-
12
-
13
-
14
-
 15
15 -
 16
16 -
 17
17 -
 18
18 -
 19
19 -
 20
20 -
 21
21 -
 22
22 -
 23
23 -
 24
24 -
 25
25 -
26
-
27
-
28
-
29
-
30
-
31
-
32
 |
 |
