Netgear PS121 PS121v2 Reference Manual - Page 15
Observe These Precautions, To Restore the Factory Default Settings, To Generate a Diagnostic Printout - default ip
 |
UPC - 606449034684
View all Netgear PS121 manuals
Add to My Manuals
Save this manual to your list of manuals |
Page 15 highlights
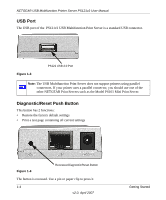
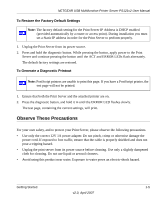
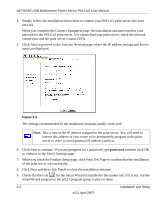
NETGEAR USB Multifunction Printer Server PS121v2 User Manual To Restore the Factory Default Settings Note: The factory default setting for the Print Server IP Address is DHCP enabled (provided automatically by a router or access point). During installation you must set a Static IP address in order for the Print Server to perform properly. 1. Unplug the Print Server from its power source. 2. Press and hold the diagnostic button. While pressing the button, apply power to the Print Server and continue pressing the button until the ACT and ERROR LEDs flash alternately. The default factory settings are restored. To Generate a Diagnostic Printout Note: PostScript printers are unable to print this page. If you have a PostScript printer, the test page will not be printed. 1. Ensure that both the Print Server and the attached printer are on. 2. Press the diagnostic button, and hold it in until the ERROR LED flashes slowly. The test page, containing the current settings, will print. Observe These Precautions For your own safety, and to protect your Print Server, please observe the following precautions. • Use only the correct 12V 1A power adapter. Do not pinch, crimp or otherwise damage the power cord. If exposed to foot traffic, ensure that the cable is properly shielded and does not pose a tripping hazard. • Unplug the print server from its power source before cleaning. Use only a slightly dampened cloth for cleaning. Do not use liquid or aerosol cleaners. • Avoid using this product near water. Exposure to water poses an electric-shock hazard. Getting Started 1-5 v2.0, April 2007
-
 1
1 -
2
-
3
-
4
-
5
-
6
-
7
-
8
-
9
-
 10
10 -
 11
11 -
 12
12 -
 13
13 -
 14
14 -
 15
15 -
 16
16 -
 17
17 -
 18
18 -
 19
19 -
 20
20 -
21
-
22
-
23
-
24
-
25
-
26
-
27
-
28
-
29
-
30
-
31
-
32
-
33
-
34
-
35
-
36
-
37
-
38
-
39
-
40
-
41
-
42
-
43
-
44
-
45
-
46
-
47
-
48
-
49
-
50
-
51
-
52
 |
 |
