Netgear PTV1000 PTV1000 Install Guide - Page 1
Netgear PTV1000 - Push2TV - TV Adapter Manual
 |
UPC - 606449069778
View all Netgear PTV1000 manuals
Add to My Manuals
Save this manual to your list of manuals |
Page 1 highlights
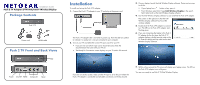
Installation Guide Push tag 2 TV Adapter (PTV1000)/Intel® Wireless Display Package Contents Push 2 TV Power cord HDMI cable Push 2 TV Front and Back Views LED Power On/Off HDMI Composite Reset Installation To install and set up the Push 2 TV adapter: 1. Connect the Push 2 TV adapter to your TV and plug in the power cord. The Push 2 TV adapter LED is red when it powers up. Then the LED turns yellow to indicate it is ready, but is not yet connected to your computer. 2. Turn on your TV and select the correct TV input source for your TV. • If you are not sure which input source should be used, check the documentation that came with your TV set. • The Ready for Connection screen displays on your TV within 30 seconds. 3. On your laptop, launch the Intel Wireless Display software. There are two ways to do this: • If your laptop has a button or key, press it. • From Windows select Start. Type Intel Wireless Display in the search field. Select and run the Intel Wireless Display software. 4. Use the Intel Wireless Display software to scan and find the Push 2 TV adapter. The screen on the right shows that the Intel Wireless Display software has found the wireless adapter. 5. Double-click the Push 2 TV adapter to connect to it. The LED on the Push 2 TV adapter starts flashing green. 6. If you are connecting the laptop to the Push 2 TV adapter for the first time, the Push 2 TV adapter displays a 4-digit security code on the TV. Enter this 4-digit security code into the Intel Wireless Display software. If you do not see this screen, make sure the TV input is set to the port where the Push 2 TV adapter is connected and all cable connections are firmly secured. 7. Within a few seconds the TV screen will display your laptop screen. The LED on the Push 2 TV adapter turns solid green. You are now ready to use Push 2 TV/Intel Wireless Display.
-
 1
1 -
 2
2
 |
 |
