Netgear RN104 ReadyNAS OS 6 Installation Guide - Page 4
Basic Setup - compatibility list
 |
View all Netgear RN104 manuals
Add to My Manuals
Save this manual to your list of manuals |
Page 4 highlights
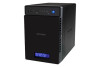
Basic Setup After you follow these instructions, your ReadyNAS is ready to use in a production environment. Setup takes approximately 15 minutes. To set up your storage system: 1. Install all available disks that you want to use in your ReadyNAS system. Note: If you are using previously formatted disks that contain data, you must reformat these disks before continuing. See Reformat Disks on page 9. For a list of supported disks, see the Hardware Compatibility List at netgear.com/readynas-hcl. For information about installing disks, see the hardware manual for your system or visit https://www.youtube.com/ watch?v=hLiu0VeXd-Y. 2. Place your system in a location that provides adequate ventilation. High-capacity disks can produce considerable heat. It is important to ensure that the fan exhausts are unobstructed. For a complete list of placement considerations, see the hardware manual for your system. 3. Connect the power adapter to the power cord. 4. Connect the power adapter to the back of the system and plug the power cord into a wall outlet or power strip. 5. Use an Ethernet cable to connect an Ethernet port on the storage system to your network. 6. If necessary, press the Power button to turn on the system. 7. Wait for the Power LED to turn solid blue or for the status display screen to display the system's IP address. 4
-
 1
1 -
 2
2 -
 3
3 -
 4
4 -
 5
5 -
 6
6 -
 7
7 -
 8
8 -
 9
9 -
 10
10 -
11
-
12
 |
 |
