Netgear RN312 Software Manual - Page 212
Update Firmware Without Direct Internet Access, To update firmware locally, System Maintenance
 |
View all Netgear RN312 manuals
Add to My Manuals
Save this manual to your list of manuals |
Page 212 highlights
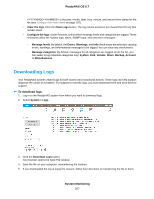
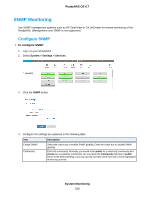
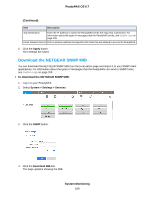
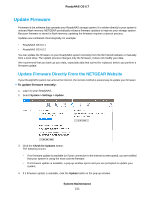
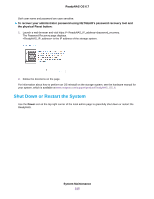
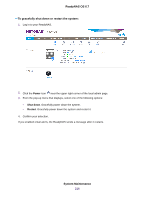
ReadyNAS OS 6.7 The system downloads the new firmware. When the download is complete, you are prompted to reboot your system. 5. Click the Reboot button. Your system reboots and installs the new firmware. If you enabled email alerts, your ReadyNAS system sends a message when the firmware update finishes. Update Firmware Without Direct Internet Access If you keep your ReadyNAS system in a location without Internet access, for example, at a remote vacation cabin, you must update your firmware locally. To update firmware locally: 1. Using a computer that can access the Internet, download the latest firmware for your system from www.netgear.com/support/product/ReadyNAS_OS_6. If you can later connect this computer to the local area network with the ReadyNAS, download directly to the computer. Otherwise, download the file to a USB drive or other portable media. 2. Connect the computer on which you downloaded the latest firmware to the network with the ReadyNAS, or if you downloaded to a USB drive, connect the USB drive to a computer on the local network. 3. Log in to your ReadyNAS. 4. Select System > Settings > Update. 5. Click the Install Firmware button. 6. Click the Browse button. 7. In the pop-up file browser, navigate to the file containing the updated firmware and select it. The Update Firmware pop-up window displays the name of the selected file in the File Name field. 8. Click the Upload button. System Maintenance 212
-
 1
1 -
2
-
3
-
4
-
5
-
6
-
7
-
8
-
9
-
10
-
11
-
12
-
13
-
14
-
15
-
16
-
17
-
18
-
19
-
20
-
21
-
22
-
23
-
24
-
25
-
26
-
27
-
28
-
29
-
30
-
31
-
32
-
33
-
34
-
35
-
36
-
37
-
38
-
39
-
40
-
41
-
42
-
43
-
44
-
45
-
46
-
47
-
48
-
49
-
50
-
51
-
52
-
53
-
54
-
55
-
56
-
57
-
58
-
59
-
60
-
61
-
62
-
63
-
64
-
65
-
66
-
67
-
68
-
69
-
70
-
71
-
72
-
73
-
74
-
75
-
76
-
77
-
78
-
79
-
80
-
81
-
82
-
83
-
84
-
85
-
86
-
87
-
88
-
89
-
90
-
91
-
92
-
93
-
94
-
95
-
96
-
97
-
98
-
99
-
100
-
101
-
102
-
103
-
104
-
105
-
106
-
107
-
108
-
109
-
110
-
111
-
112
-
113
-
114
-
115
-
116
-
117
-
118
-
119
-
120
-
121
-
122
-
123
-
124
-
125
-
126
-
127
-
128
-
129
-
130
-
131
-
132
-
133
-
134
-
135
-
136
-
137
-
138
-
139
-
140
-
141
-
142
-
143
-
144
-
145
-
146
-
147
-
148
-
149
-
150
-
151
-
152
-
153
-
154
-
155
-
156
-
157
-
158
-
159
-
160
-
161
-
162
-
163
-
164
-
165
-
166
-
167
-
168
-
169
-
170
-
171
-
172
-
173
-
174
-
175
-
176
-
177
-
178
-
179
-
180
-
181
-
182
-
183
-
184
-
185
-
186
-
187
-
188
-
189
-
190
-
191
-
192
-
193
-
194
-
195
-
196
-
197
-
198
-
199
-
200
-
201
-
202
-
203
-
204
-
205
-
206
-
 207
207 -
 208
208 -
 209
209 -
 210
210 -
 211
211 -
 212
212 -
 213
213 -
 214
214 -
 215
215 -
 216
216 -
 217
217 -
218
-
219
-
220
-
221
-
222
-
223
-
224
-
225
-
226
-
227
-
228
-
229
-
230
-
231
-
232
-
233
-
234
-
235
-
236
-
237
-
238
-
239
-
240
-
241
-
242
-
243
-
244
-
245
-
246
-
247
-
248
-
249
-
250
-
251
-
252
-
253
-
254
-
255
 |
 |
