Netgear RN526X00 ReadyNAS OS 6 Installation Guide - Page 5
Wait for the Power LED to turn solid blue or for the status display
 |
View all Netgear RN526X00 manuals
Add to My Manuals
Save this manual to your list of manuals |
Page 5 highlights
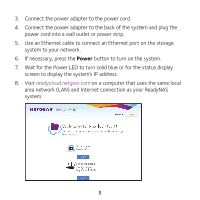
3. Connect the power adapter to the power cord. 4. Connect the power adapter to the back of the system and plug the power cord into a wall outlet or power strip. 5. Use an Ethernet cable to connect an Ethernet port on the storage system to your network. 6. If necessary, press the Power button to turn on the system. 7. Wait for the Power LED to turn solid blue or for the status display screen to display the system's IP address. 8. Visit readycloud.netgear.com on a computer that uses the same local area network (LAN) and Internet connection as your ReadyNAS system. 5
-
 1
1 -
 2
2 -
 3
3 -
 4
4 -
 5
5 -
 6
6 -
 7
7 -
 8
8 -
 9
9 -
 10
10 -
 11
11 -
12
-
13
-
14
-
15
-
16
 |
 |

5
3.
Connect the power adapter to the power cord.
4.
Connect the power adapter to the back of the system and plug the
power cord into a wall outlet or power strip.
5.
Use an Ethernet cable to connect an Ethernet port on the storage
system to your network.
6.
If necessary, press the
Power
button to turn on the system.
7.
Wait for the Power LED to turn solid blue or for the status display
screen to display the system’s IP address.
8.
Visit
readycloud.netgear.com
on a computer that uses the same local
area network (LAN) and Internet connection as your ReadyNAS
system.