Netgear RNRX4410 ReadyNAS 2100 User Manual - Page 49
Enable SNMP, service, Community, public, Trap destination, Hosts, allowed access, Apply
 |
UPC - 606449062137
View all Netgear RNRX4410 manuals
Add to My Manuals
Save this manual to your list of manuals |
Page 49 highlights
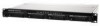
ReadyNAS 2100 User Manual 1. Select the SNMP tab to display the SNMP settings. 2. Select the Enable SNMP service check box. You can leave the Community field set to public, or specify a private name if you have opted for a more segregated monitoring scheme. 3. Enter a host name or an IP address in the Trap destination field. This is where all trap messages will be sent. The following system events generate a trap: • Abnormal power voltage • Abnormal board enclosure temperature • Fan failure • UPS connected • UPS detected power failure • RAID disk sync started and finished • RAID disk added, removed, and failure • Snapshot invalidated 4. If you wish to limit SNMP access to only a secure list of hosts, specify the hosts in the Hosts allowed access field. 5. Click Apply to save your settings. When you have saved the SNMP settings on the ReadyNAS 2100, you can import the NETGEAR SNMP MIB to your SNMP client application. The NETGEAR MIB can be obtained from the included Installation CD or downloaded from the NETGEAR Support site at http://www.netgear.com/support. SMTP The ReadyNAS 2100 device has a built-in e-mail message transfer agent (MTA) that is set up to send alert e-mail messages from the device. Some corporate environments, however, might have a firewall that blocks untrusted MTAs from sending out messages. Setting Up and Managing Your ReadyNAS 2100 v1.0, May 2009 2-29
-
 1
1 -
2
-
3
-
4
-
5
-
6
-
7
-
8
-
9
-
10
-
11
-
12
-
13
-
14
-
15
-
16
-
17
-
18
-
19
-
20
-
21
-
22
-
23
-
24
-
25
-
26
-
27
-
28
-
29
-
30
-
31
-
32
-
33
-
34
-
35
-
36
-
37
-
38
-
39
-
40
-
41
-
42
-
43
-
 44
44 -
 45
45 -
 46
46 -
 47
47 -
 48
48 -
 49
49 -
 50
50 -
 51
51 -
 52
52 -
 53
53 -
 54
54 -
55
-
56
-
57
-
58
-
59
-
60
-
61
-
62
-
63
-
64
-
65
-
66
-
67
-
68
-
69
-
70
-
71
-
72
-
73
-
74
-
75
-
76
-
77
-
78
-
79
-
80
-
81
-
82
-
83
-
84
-
85
-
86
-
87
-
88
-
89
-
90
-
91
-
92
-
93
-
94
-
95
-
96
-
97
-
98
-
99
-
100
-
101
-
102
-
103
-
104
-
105
-
106
-
107
-
108
-
109
-
110
-
111
-
112
-
113
-
114
-
115
-
116
-
117
-
118
-
119
-
120
-
121
-
122
-
123
-
124
 |
 |
