Netgear WAC540 Installation Guide - Page 1
Netgear WAC540 Manual
 |
View all Netgear WAC540 manuals
Add to My Manuals
Save this manual to your list of manuals |
Page 1 highlights
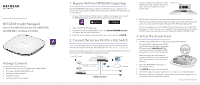
Installation Guide NETGEAR Insight Managed Smart Cloud Wireless Access Point (WAC540) AC3000 802.11ac Wave 2 Tri Radio Insight Package Contents • Wireless access point model WAC540 or WAC540PA • DC power adapter (WAC540PA only) • Ceiling and wall-mount kit • Installation guide • Ceiling and wall-mount guide 1. Register With the NETGEAR Insight App Use the NETGEAR Insight app to create your network, set up, configure, and monitor your access point, register your access point, activate your warranty, and access support. 1. On your iOS or Android mobile device or tablet, visit the app store, search for NETGEAR Insight, and download the latest version of the app. 2. Open the NETGEAR Insight app. 3. If you did not set up a NETGEAR account, tap Create NETGEAR Account and follow the onscreen instructions. 4. Enter the email address and password for your account and tap LOG IN. 2. Connect the Access Point to a PoE Switch Note: For information about connecting the access point to a non-PoE switch, see the user manual, which you can download from www.netgear.com/support. During initial setup, connect the access point to a network with Internet access so that you can use the NETGEAR Insight app for setup. Local WiFi access PoE switch Cloud access WAC540 access point Internet Sample Connections 1. Connect an Ethernet cable from a PoE switch to the LAN 1 port on the access point, which is located next to the power input. LAN 1 port 2. Wait for the access point to receive power and connect to your network. The Power/Cloud LED on the access point lights solid amber while the access point is booting, and then lights solid green. The WiFi LEDs light green. The access point receives an IP address from a DHCP server (or a router that functions as a DHCP server) in your network. If your network does not include a DHCP server, the access point uses its default IP address 192.168.0.100. 3. Set Up the Access Point 1. Connect your mobile device to the access point's WiFi network. The default WiFi network name (SSID) is on the access point label. The default WiFi password is sharedsecret. (We recommend that you change the WiFi password to a more secure password.) After the Insight app discovers the access point, you can use cloud access if the access point is connected to the Internet. 2. Open the NETGEAR Insight app on your mobile device. 3. Tap LOG IN and enter your credentials. 4. Click the + sign in the upper right corner to create a new network/location. 5. Name your network and specify a device admin password that applies to all the devices that you add to this network. Continued on the other side.
-
 1
1 -
 2
2
 |
 |
