Netgear WG111U WG111U Installation Guide - Page 1
Netgear WG111U - Double 108 Mbps Wireless USB 2.0 Adapter Manual
 |
View all Netgear WG111U manuals
Add to My Manuals
Save this manual to your list of manuals |
Page 1 highlights
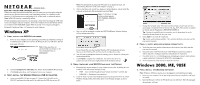
)NSTALLATION'UIDE Super AG TM Wireless USB 2.0 Adapter WG111U These basic setup instructions assume that you will connect to an access point using the default security options. Please refer to the online help and the User's Manual on the Resouce CD for instructions on configuring WEP, Ad-hoc mode, or advanced options. Note: WPA-PSK security is enabled by default. See the installation instructions for your operating system before attaching the USB cable to the USB Adapter and your computer. Drivers for Windows 98 Second Edition and ME are available on the NETGEAR support Web site at http://www.netgear.com/support. Estimated Completion Time: 5-15 minutes for each computer. Windows XP 1. FIRST, INSTALL THE WG111U SOFTWARE. a. Power on your computer, let the operating system boot up completely, and log in as needed. Insert the Resource CD for the WG111U into your CD drive. The CD main page will load. Note: If this page does not automatically load, browse to the CD, and double-click on autorun.exe. b. Click the Install Driver and Utility link. Follow the InstallShield Wizard steps. c. Click Finish when done, and if prompted restart your computer. 2. NEXT, INSTALL THE WG111U WIRELESS USB 2.0 ADAPTER. a. Locate an available USB port on your PC. Connect the USB cable to the WG111U and insert the other end of the cable into the USB slot on your PC. Note: For information on placing the WG111U in an optimal location, see "Determining Placement of the USB Adapter" on page 2. b. After a short delay, the Found New Hardware Wizard displays. Select Install the software automatically (Recommended) and click Next. Note: If a Windows XP logo testing warning appears, click Continue Anyway to proceed. c. Next you will be prompted to enable the NETGEAR Smart Wireless Settings Utility configuration utility. Click Yes to accept this option. If you choose No, you must read the Windows XP documentation to learn how to use the Windows XP wireless network configuration utility. d. You will also be prompted to choose the country you are located in. Select your location from the list. e. Click Finish to complete the installation. You will see the WG111U system tray icon on the lower right portion of the Windows task bar. 3. NOW, CONFIGURE YOUR WG111U AND SAVE THE PROFILE. a. Determine the current settings for your wireless access point, including the casesensitive SSID and security settings (if any): • WEP - 64 or 128 bit, Passphrase (case-sensitive) or Key # with hex key • WPA-PSK - Passphrase (case-sensitive) b. Click the WG111U icon in the Windows system tray to open the WG111U Smart Wireless Settings Utility. The utility opens to the Settings tab page, as shown below. c. Change the Network Name SSID and security settings to match your wireless access point. The default SSID is NETGEAR_11g. WPA-PSK security is enabled by default and the Passphrase is NETGEAR-ULTRA-G. Tip: To view the available wireless networks, use the drop-down list or the Networks tab and choose the one you want. d. Click Apply to activate the connection. Tip: Create work and home profiles. Then, activate whichever one you need for your current location. 4. FINALLY, VERIFY WIRELESS NETWORK CONNECTIVITY. a. Verify that the status monitor information at the bottom of the utility matches your wireless network. b. Check the color of the WG111U icon in the Windows system tray: green or yellow indicates a working connection; red indicates no connection. c. Check the WG111U LED: blinking means attempting to connect; solid indicates a good connection; off means the WG111U is not plugged in. d. Verify connectivity to the Internet or network resources. Windows 2000, ME, 98SE 1. FIRST, INSTALL THE WG111U SOFTWARE. Note: Windows 2000 may require you to be logged on with administrator rights. a. Power on your computer, let the operating system boot up completely, and log in as needed. b. Insert the Resource CD for the WG111U into your CD drive. The CD main page shown below will load.
-
 1
1 -
 2
2
 |
 |
