Netgear WGX102v2 WGX102v2 Installation Guide - Page 1
Netgear WGX102v2 - 54 Mbps Wall-Plugged Wireless Range Extender Manual
 |
View all Netgear WGX102v2 manuals
Add to My Manuals
Save this manual to your list of manuals |
Page 1 highlights
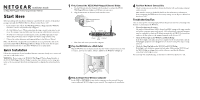
Installation Guide 54 Mbps Wall-Plugged Wireless Range Extender WGX102 Start Here Before proceeding with installation, familiarize yourself with the contents of the product package, especially the WGX102 Reference Manual on the Resource CD. • Each computer that will use the Wall-Plugged Wireless Range Extender WGX102 must have a wireless card installed and configured. • For Cable Modem Service: When you perform the range extender setup steps, be sure to use the computer you used when you first set up your cable Internet connection. • For DSL Service: You may need information such as the DSL login name/e-mail address and password in order to complete the wireless range extender setup. • Observe the wireless placement and range guidelines in the Reference Manual. Note: The WGX102 is designed for easy installation in access point mode, and can be used with multiple XE102 Wall-Plugged Ethernet Bridges in this mode. Use the quick installation instructions here to install the WGX102 in access point mode. Quick Installation Follow these instructions if your broadband Internet connection already uses a router, and you want to add wireless access. WARNING: Do not connect the WGX102 Wall-Plugged Wireless Range Extender or the XE102 Wall-Plugged Ethernet Bridge to a power strip, extension cord, or surge protector as this may prevent them from working properly or degrade the network performance. 1 First, Connect the XE102 Wall Plugged Ethernet Bridge a. Use the Ethernet cable that shipped with the product to connect the XE102 Wall-Plugged Ethernet bridge to a LAN port on your router. b. Plug the XE102 into an electrical outlet near the router. Wall-Plugged Ethernet Bridge XE102 Router Power LAN Internet Ports c. Shut down and restart your wireless computer. 2 Plug the WGX102 into a Wall Outlet Plug the WGX102 into an electrical outlet near the wireless computer that you want to connect, and wait one minute. All three LEDS on the WGX102 will light up. Room 1 Room 2 WGX102 Wireless Notebook PC Desktop PC 3 Now, Configure Your Wireless Computer Set the SSID to NETGEAR for any wireless computers on the network. You may connect additional XE102 bridges to your network. This completes the installation. 4 Test Your Network Connectivity Check to make sure you are able to browse the Internet with each wireless computer on the network. Note: Wireless security is disabled by default on the WGX102. For information about configuring the WGX102 to use security settings, see the Reference Manual on the Resource CD. Troubleshooting Tips Here are some tips for correcting simple problems that prevent you from connecting to the Internet or connecting to the WGX102. • Network settings must be correct. The wireless Network Name (SSID), channel, and WEP settings of the range extender and wireless computers must match exactly. LAN and wirelessly connected computers must be configured to obtain an IP address automatically via DHCP. For instructions on how to do this, please see the animated tutorials on the Resource CD. • Check the Power light on the WGX102 and XE102 Bridge. If the Power light is off, make sure power is supplied to the electrical outlet, and the wall-plugged equipment is not plugged into an extension cord, power strip, or surge protector. • Check the HomePlug light on the WGX102 and XE102 Bridge. If this light is off, the devices cannot find each other. Make sure the WGX102 and the XE102 Bridge are plugged into outlets with power and that the Ethernet connection to the bridge is secure. For more help with troubleshooting, see the Reference Manual on the Resource CD.
-
 1
1 -
 2
2
 |
 |
