Netgear WN511T WN511T Installation Guide - Page 1
Netgear WN511T - RangeMax Next Wireless Notebook Adapter Manual
 |
UPC - 606449047332
View all Netgear WN511T manuals
Add to My Manuals
Save this manual to your list of manuals |
Page 1 highlights
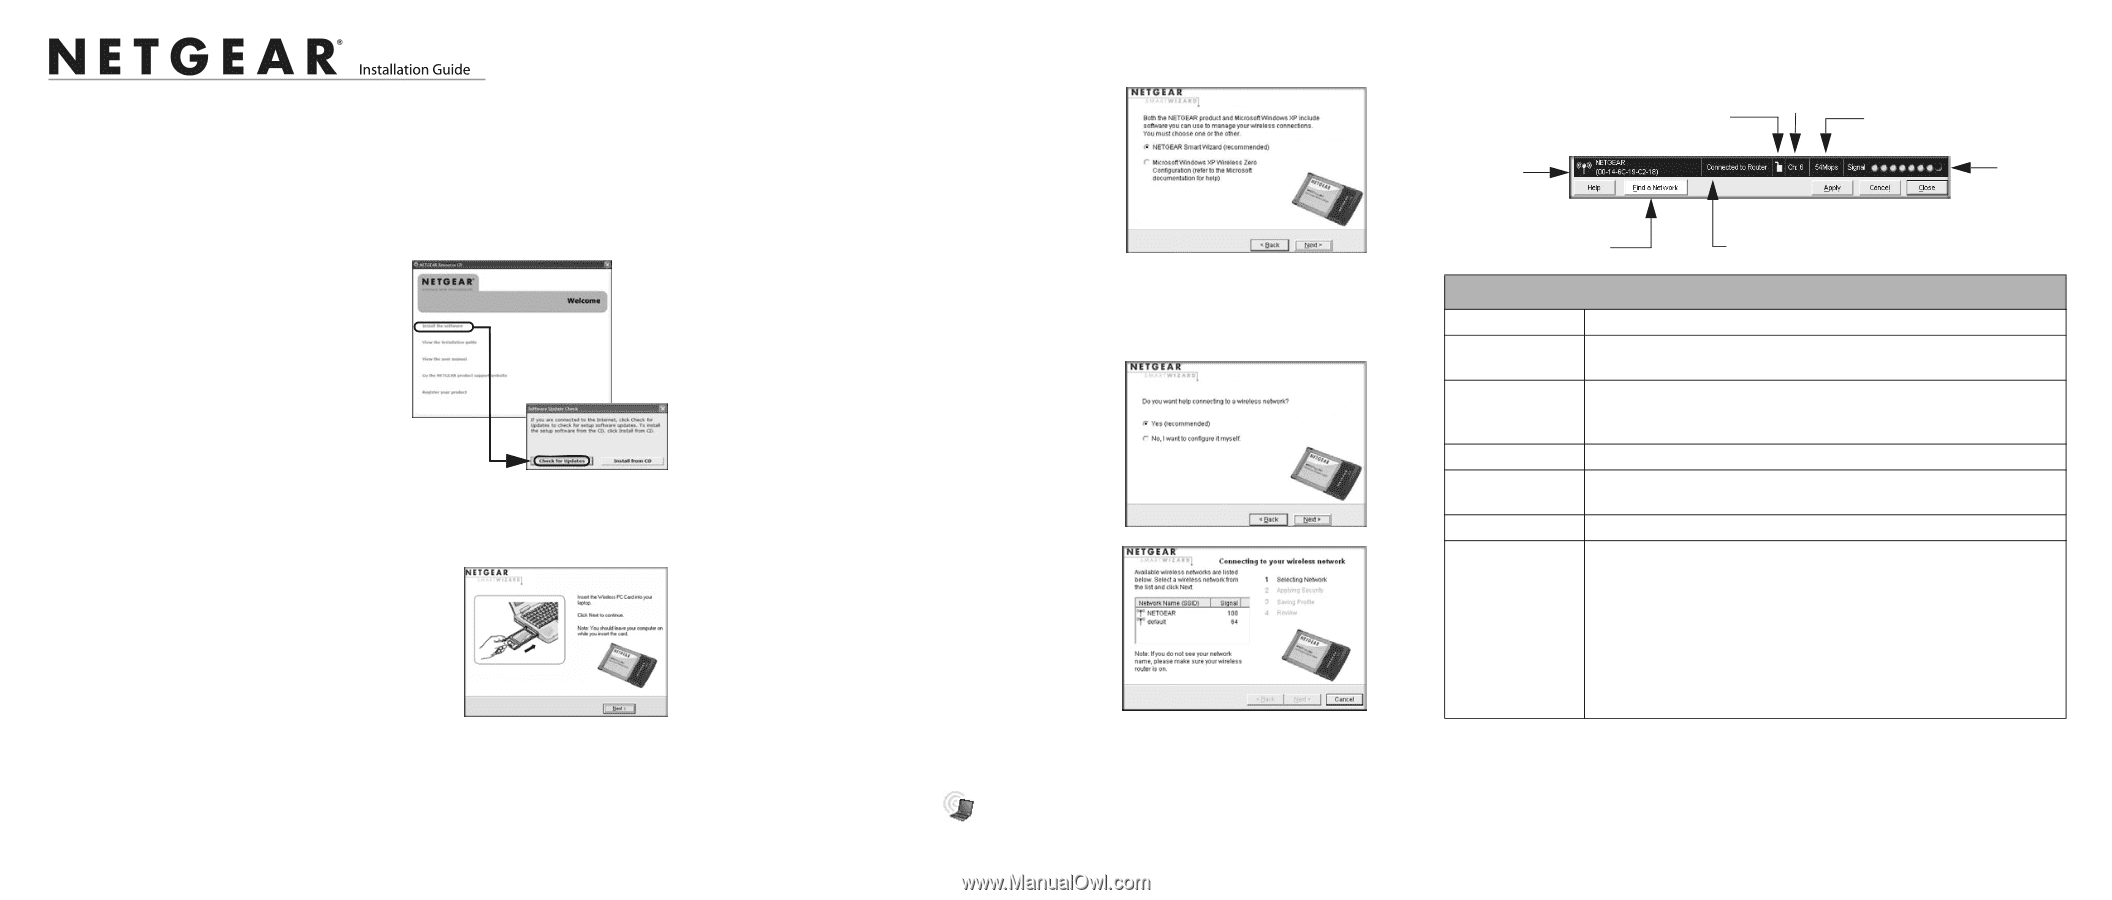
)NSTALLATION'UIDE NETGEAR RangeMax™ NEXT Wireless Notebook Adapter WN511T These setup instructions assume that you will connect to an access point or wireless router. Estimated completion time: 10 minutes. Installation 1. First, install the WN511T software. Insert the NETGEAR CD. If the CD main page does not appear, double click Autorun.exe on the CD. a. Click Install the Software.The Check for Updates window will open. b. If you are connected to the Internet, click Check for Updates. If not, you can choose to install from the CD. c. When the Installation Complete message appears, click Next. d. On the SmartWizard screen, click Next to proceed with the SmartWizard setup. 2. Now, insert the wireless notebook adapter. a. When prompted, insert your wireless notebook adapter. b. Click Next to proceed. Windows will discover the adapter and continue the software installation process. c. Follow the Windows prompts to complete the software installation. If a Windows logo certification warning appears, click Continue to proceed with the installation. d. When the Windows software installation is complete, click Finish. 3. Use the Smart Wizard to set up your wireless notebook adapter. a. Windows 2000 users go to Step b. Windows XP or Vista users can set up the wireless adapter with the NETGEAR Smart Wizard (recommended) or the Windows configuration utilities. • NETGEAR Smart Wizard: Reveals more information about each network and makes it easier to troubleshoot network connection problems. • Windows configuration utilities: See the Windows documentation or "Using Windows XP and Vista Wireless Configuration Utilities" at: http://documentation.netgear.com/reference/enu/winzerocfg/index.htm b. Click Next to accept the NETGEAR Smart Wizard. You will be prompted to let the wizard help you connect to a network (recommended). c. Click Next to accept. 4. Connect to a wireless network. a. Select the wireless network from the dropdown list, and the wizard records your choice. Note: Hidden networks do not broadcast the Network Name (SSID). These networks are included in the drop-down list, but the Network Name (SSID) is blank. b. The Smart Wizard will detect if the network uses security or not. Follow the Wizard steps for Security (if used) and for saving a Profile. c. After you have reviewed the settings, click Finish. The WN511T icon appears in the system tray and on the desktop, and the Settings page opens. The wizard initiates your wireless connection. It could take up to a minute for your wireless connection to be established. Using the Status Bar The status bar is located at the bottom of the Settings page. Security Channel Throughput Wireless network Signal strength Find a Network Connection status Understanding the Status Bar Wireless network Identifies which wireless network you have joined. Security • Locked: security enabled. • Unlocked: security not enabled. Channel The wireless channel used by the network. If many wireless networks in your area use the same channel they can interfere with one another. Throughput Wireless throughput measured in Mega bits per second. Signal strength More dots indicates a stronger signal. Usually, you will experience higher throughput when the signal is strongest. Find a Network Click Find a Network to open the Connection Wizard. Connection status Identifies the status of your network connection. • Connected to Internet: Wireless Internet connection is OK. • Connected to Router: Wireless connection to the router is OK but the router is not connected to the Internet. • 169.254.x.x or The wireless connection to the router is OK but there is a problem with the router. See the online help or the NETGEAR RangeMax™ NEXT Wireless Notebook Adapter WN511T User Manual on the NETGEAR CD for troubleshooting tips.
-
 1
1 -
 2
2
 |
 |