Netgear WNDA3100v2 WNDA3100v2 Installation Guide - Page 2
Technical Support - adapter is not found
 |
View all Netgear WNDA3100v2 manuals
Add to My Manuals
Save this manual to your list of manuals |
Page 2 highlights
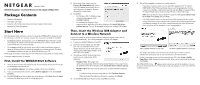
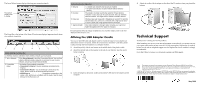
The Smart Wizard screen displays showing your connection details. The default profile name is Profile. The Status Bar at the bottom of the Smart Wizard screen displays important details about your wireless connection. 1 2 3 4 5 6 7 Understanding the Status Bar 1. Wireless network Identifies which wireless network you have joined. 2. Join a Network 3. Connection status Click Join a Network to start the Connection Wizard. You can then select a different wireless network or reconnect to your current network, should you become disconnected. The status of your network connection. • Connected to Internet. You are wirelessly connected to the Internet. • Connected to Router. You are wirelessly connected to the router, but the router is not connected to the Internet. • 169.254.x.x or The wireless connection to the router is OK, but there is a problem with the router. See the User Manual on the Resource CD. Understanding the Status Bar 4. Security 5. Channel 6. Data rate 7. Signal strength • A closed lock indicates that security is enabled. • An open lock indicates an open network without wireless security. The wireless channel used by the network. If many wireless networks in your area use the same channel, they can interfere with one another. You might want to switch to another channel. Wireless data rate measured in Megabits per second. To optimize wireless data rate, connect to a network with a high-speed router or access point and a high-speed Internet connection. More dots indicates a stronger signal. Usually, you experience higher throughput when the signal is strongest. For information about all settings available for your wireless adapter, refer to the User Manual on the Resource CD. Affixing the USB Adapter Cradle You can use the USB cable and adapter cradle to extend the range of your adapter and obtain better wireless reception. Follow the instructions to attach the USB cable, plastic cradle, and loop-and-hook fasteners to a computer monitor. 1. Attach the prickly side of one fastener to the middle back of the plastic cradle. 2. Attach the smooth side of the fastener to the side of your monitor, near the top for better reception. 4. Attach the cradle with the adapter to the side of the PC monitor where you placed the fastener. Technical Support Thank you for selecting NETGEAR products. After installing your device, locate the serial number on the label of your product and use it to register your product at http://www.NETGEAR.com/register. Registration is required before you can use our telephone support service. Registration via our website is strongly recommended. Go to http://kbserver.netgear.com for product updates and Web support. 3. Insert the adapter in the plastic cradle and attach the USB cable to the adapter and the computer. This symbol was placed in accordance with the European Union Directive 2002/96 on the Waste Electrical and Electronic Equipment (the WEEE Directive). If disposed of within the European Union, this product should be treated and recycled in accordance with the laws of your jurisdiction implementing the WEEE Directive. © 2009 by NETGEAR, Inc. All rights reserved. NETGEAR and the NETGEAR logo are registered trademarks of NETGEAR, Inc. in the United States and/or other countries. Other brand and product names are trademarks or registered trademarks of their respective holders. Information is subject to change without notice. May 2009
-
 1
1 -
 2
2
 |
 |
