Netgear WNR1000 WNR1000 Setup Manual - Page 30
Testing Basic Wireless Connectivity, Enter, admin, password, Wireless Settings, Apply - admin password
 |
UPC - 606449062588
View all Netgear WNR1000 manuals
Add to My Manuals
Save this manual to your list of manuals |
Page 30 highlights
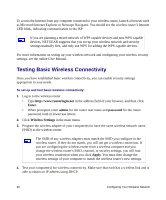
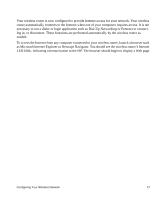
To access the Internet from any computer connected to your wireless router, launch a browser such as Microsoft Internet Explorer or Netscape Navigator. You should see the wireless router's Internet LED blink, indicating communication to the ISP. If you are planning a mixed network of WPS capable devices and non-WPS capable devices, NETGEAR suggests that you set up your wireless network and security settings manually first, and only use WPS for adding the WPS capable devices. For more information on setting up your wireless network and configuring your wireless security settings, see the online User Manual. Testing Basic Wireless Connectivity Once you have established basic wireless connectivity, you can enable security settings appropriate to your needs. To set up and test basic wireless connectivity: 1. Log in to the wireless router. • Type http://www.routerlogin.net in the address field of your browser, and then click Enter. • When prompted, enter admin for the router user name and password for the router password, both in lowercase letters. 2. Click Wireless Settings in the main menu. 3. Program the wireless adapter of your computer(s) to have the same wireless network name (SSID) as the wireless router. The SSID of any wireless adapters must match the SSID you configure in the wireless router. If they do not match, you will not get a wireless connection. If you are configuring the wireless router from a wireless computer and you change the wireless router's SSID, channel, or security settings, you will lose your wireless connection when you click Apply. You must then change the wireless settings of your computer to match the wireless router's new settings. 4. Test your computer(s) for wireless connectivity. Make sure that each has a wireless link and is able to obtain an IP address using DHCP. 26 Configuring Your Wireless Network
-
 1
1 -
2
-
3
-
4
-
5
-
6
-
7
-
8
-
9
-
10
-
11
-
12
-
13
-
14
-
15
-
16
-
17
-
18
-
19
-
20
-
21
-
22
-
23
-
24
-
 25
25 -
 26
26 -
 27
27 -
 28
28 -
 29
29 -
 30
30 -
 31
31 -
 32
32 -
 33
33 -
 34
34 -
 35
35 -
36
-
37
-
38
-
39
-
40
-
41
-
42
-
43
-
44
-
45
-
46
-
47
-
48
 |
 |