Nextar M3-02 M3-02 QSG_Eng - Page 1
Nextar M3-02 Manual
 |
View all Nextar M3-02 manuals
Add to My Manuals
Save this manual to your list of manuals |
Page 1 highlights
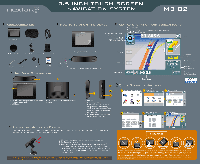
3.5 INCH TOUCH SCREEN NAVIGATION SYSTEM M3-02 ACCESSORIES LIST • 3.5" GPS Device - Carry Pouch TY Car Adaptor Dashboard Mount Disk Windshield Mounting Bracket(x2) Mounting Cradle (x2) ILIMAM tylus Pen USB Cable Car Adaptor SD card with maps UNIT VIEW DESCRIPTION OW To TURN ON THE DE Peel the protective sticker off the GPS Insert included SD card with preloaded maps Press the "ON" button located on top of the GPS KEYPAD OPERATION AND SCREEN ICONS Compass & GPS Status - Displays the direction of travel and GPS status (on/off). Map Display Mode - Tap to choose 3D, Heading Up, or North Up. 513 11:20 am Name of next street on route P Mute 805 Zoom In Zoom Out mENuai Main Menu I-805 0.3 mi Arrival lime 11:40 am 16 mi VIEW Distance to Next Turn Estimated Time of Arrival Distance to Destination Change Information Bar F10 1. POWER button - Press the power button to enter or exit the standby mode. 2. LCD Screen utton 2. Speaker ....... unit eezes press button) 0 1. USB Port 2. SD Memory Card slot 3. Headphone Jack - Used to connect headphones for private listening. When the headphones are connected to this jack, the speaker will be turned off automatically. 4. DC 5V Input Jack - Used to connect to the supplied power adaptor. USING THE MOUNTING BRACKET When using the unit in vehicle, you can use the supplied mounting assemblies (mounting bracket, mounting cradle and dashboard mount disk) to mount the unit in the vehicle. Take the following steps to operate: Current Road QUICK STEPS TO NAVIGATE NAVTEQ ON BOARD M Press Menu, Select Destination X Select Address and then a press "Start with city" ENTER DESTINATION DESTINATION HISTORY NEAREST P01 SET (#) AS HOME SAVE AS FAVORITE SETTING ADDRESS POI SORT MYRON STREET IN SAN DIEGO REGION • e, CROSSROAD OTY mars EnAtveirit4NLme 'AN _ l _ X I [SAN ANDREAS SAN ANGELO 4 000 D 1300 1517 GIQUI o MeAgPi Enter Street Name nter Street Name above c, type bor.) 999nP9999 P 0000 ° P Q 0 El OW 0130E30B Enter 'louse Number Building Number Range: 300 to 3999 4 sw Start Navigation !It: •- miasma. RI 1:20 am miIst mENulEg I-sos 0.3 mi Amainni 11:40 an 16 nil I VIEW Safety Advice 1. Slide the mounting cradle onto the end of the mounting bracket. 2. Lift the suction cup lever. 3. To mount to windshield, press the suction cup to the windshield and press down on the suction cup lever. To mount to dashboard, use the included adhesive disk. Choose a clean, dry spot on your dashboard, peel off protection liner from the back of the disk, and then attach the disk to your dashboard. "NOTICE TO DRIVERS IN CALIFORNIA AND MINNESOTA: State law prohibits drivers in California and Minnesota from using suction mounts on their windshields while operating motor vehicles. Other state or local laws may also prohibit drivers from using suction cups on their windshields. (See California Vehicle Code Section 26708(a); Minnesota Statutes 2005, Section 169.71)" 4 •6 6 46 >45.C/113.F We strongly recommend that you observe the usage precautions laid out in this instruction. In no event will Nextar be liable for any indirect, incidental, special or consequential damages to any persons caused by Nextar's negligence, or for any lost profits, lost savings, loss of use, lost revenues or lost data arising from or relating to this device, even if Nextar has been advised of the possibility of such damages. In no event will Nextar's liability or damages to you or any other person ever exceed the amount paid by you for the device, regardless of the form of the claim. Some countries/states do not allow the limitations or exclusion of liability for incidental or consequential damages, so the above limitation or exclusion may not apply to you.
-
 1
1
 |
 |