Nextar N3-506 N3-506 User's Manual - Page 8
Step 3, Rotate the image right by clicking the Rotate Right button.
 |
View all Nextar N3-506 manuals
Add to My Manuals
Save this manual to your list of manuals |
Page 8 highlights
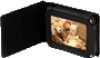
Step 3: When the Photo Manager is running, select the image files that you want from the left pane. Step 4: Click the "Move To Internal memory" button to send the selected image files to the unit. Before moving, you can: ·Rotate the image left by clicking the "Rotate Left" button. ·Rotate the image right by clicking the "Rotate Right" button. ·Crop an area from the image by clicking the "Crop to Select" button. Step 5: Wait for the transfer progress to complete before disconnecting the unit from the computer. - 8 -
-
 1
1 -
2
-
 3
3 -
 4
4 -
 5
5 -
 6
6 -
 7
7 -
 8
8 -
 9
9 -
 10
10 -
 11
11 -
 12
12 -
 13
13 -
14
-
15
-
16
-
17
 |
 |

Step 3:
When the Photo Manager is running, select the image files that you want from the left
pane.
Step 4:
Click the “Move To Internal memory” button to send the selected image files to the unit.
Before moving, you can:
·
Rotate the image left by clicking the “Rotate Left” button.
·
Rotate the image right by clicking the “Rotate Right” button.
·
Crop an area from the image by clicking the “Crop to Select” button.
Step 5:
Wait for the transfer progress to complete before disconnecting the unit from the
computer.
- 8 -