Nextar P7 P7 Quick Start Guide - Page 1
Nextar P7 Manual
 |
UPC - 714129959421
View all Nextar P7 manuals
Add to My Manuals
Save this manual to your list of manuals |
Page 1 highlights
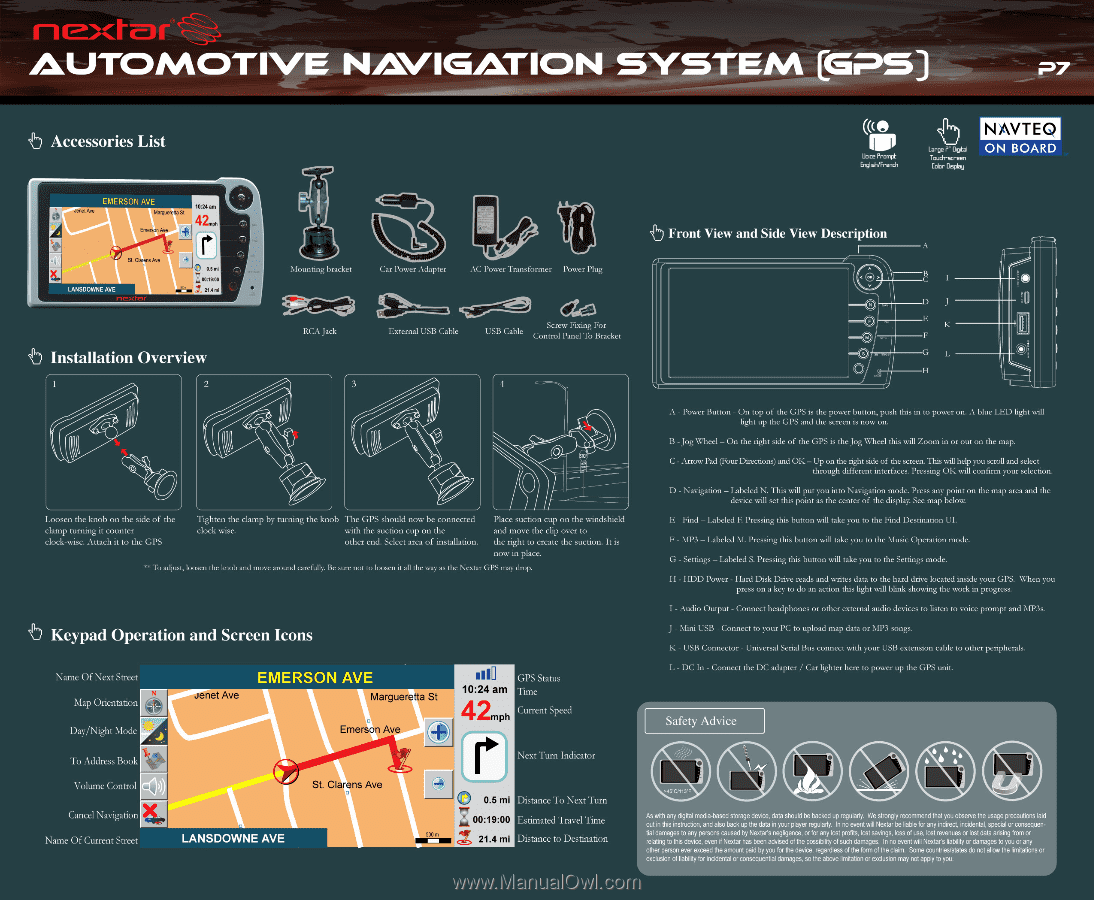
111.1TOMOTIVE NAVIGMION SYSTEM [GPS b Accessories List (e Lloice Prompt English/French Large P" Digital Touch-screen Color Display NAVTEQ ON BOARD EMERSON AVE Janet Ave Margueretta St 10:24 am 42.. Emerson Ave r r-• St Clarens Ave 0.5 ml A00:19:00 LANSDOWNE AVE 1, 21,4 ml Mounting bracket I 4 Car Power Adapter AC Power Transformer Power Plug Front View and Side View Description .1 A e > V 14:1i 3:41, 11 RCA Jack External USB Cable Screw Fixing For USB Cable Control Panel To Bracket N F E M ti Installation Overview 2 4 • S O .2- 0lpl 0 O • Loosen the knob on the side of the clamp turning it counter clock-wise. Attach it to the GPS Tighten the clamp by turning the knob The GPS should now be connected clock wise. with the suction cup on the other end. Select area of installation. Place suction cup on the windshield and move the clip over to the right to create the suction. It is now in place. "' lb adjust, loosen the knob and move around carefully. Be sure not to loosen it all the way as the Nextar GPS may drop. Keypad Operation and Screen Icons Name Of Next Street Map Orientation Day/Night Mode EMERSON AVE ,tenet Ave Margueretta St Emerson Ave GPS Status 10:24 am Time 42mph Current Speed To Address Book Next Turn Indicator Volume Control )4. Cancel Navigation Name Of Current Street LANSDOWNE AVE St. Clarens Ave O 0.5 mi Distance To Next Turn ""r 00:19:00 Estimated Travel Time 500 m 21.4 mi Distance to Destination A - Power Button - On top of the GPS is the power button, push this in to power on. A blue LED light will light up the GPS and the screen is now on. B - Jog Wheel - On the right side of the GPS is the Jog Wheel this will Zoom in or out on the map. C - Arrow Pad (Four Directions) and OK - Up on the right side of the screen. This will help you scroll and select through different interfaces. Pressing OK will confirm your selection. D - Navigation - Labeled N. This will put you into Navigation mode. Press any point on the map area and the device will set this point as the center of the display. See map below. E - Find - Labeled F Pressing this button will take you to the Find Destination UI. F - MP3 - Labeled M. Pressing this button will take you to the Music Operation mode. G - Settings - Labeled S. Pressing this button will take you to the Settings mode. H - HDD Power - Hard Disk Drive reads and writes data to the hard drive located inside your GPS. When you press on a key to do an action this light will blink showing the work in progress. I - Audio Output - Connect headphones or other external audio devices to listen to voice prompt and MP3s. J - Mini USB - Connect to your PC to upload map data or MP3 songs. K - USB Connector - Universal Serial Bus connect with your USB extension cable to other peripherals. L - DC In - Connect the DC adapter / Car lighter here to power up the GPS unit. Safety Advice (T//„? // >45'C/113'F As with any digital media-based storage device, data should be backed up regularly. We strongly recommend that you observe the usage precautions laid out in this instruction, and also back up the data in your player regularly. In no event will Nextar be liable for any indirect, incidental, special or consequential damages to any persons caused by Nextar's negligence, or for any lost profits, lost savings, loss of use, lost revenues or lost data arising from or relating to this device, even if Nextar has been advised of the possibility of such damages. In no event will Nextar's liability or damages to you or any other person ever exceed the amount paid by you for the device, regardless of the form of the claim. Some countries/states do not allow the limitations or exclusion of liability for incidental or consequential damages, so the above limitation or exclusion may not apply to you.
-
 1
1
 |
 |