Nikon 1683 Instruction Manual - Page 26
lewflnder/vlewlng, focusing
 |
View all Nikon 1683 manuals
Add to My Manuals
Save this manual to your list of manuals |
Page 26 highlights
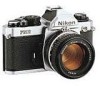
-CONTROLS IN DETAIL-continued--------- Inside the viewfinder: 1. Fine mattel Fresnel outer field 2. Microprism colla r 3. Split-image rangefinder spot 4. 12 mm-diameter reference circle 2 3 4 V.lewflnder/vlewlng & focusing The conventional way of securing correct focus is to turn the lens focusing ring until the image in the viewfinder appears sharp. The K2 focusing screen that comes with the camera as standard equipment has three focusing aids. When focusing with the split image, turn the ring until the image in the two halves becomes whole. With the microprism grid, turn the ring until the shimmering image appears sharp . With the matte outer field, turn the ring until the image appears sharp. The split-image rangefinder works well for subjects with definite lines, contours and boundaries. The microprism collar is for focusing on fastmoving subjects or those with indistinct lines, wh ile the matte outer field is suitable for close-ups or when using lenses with a maximum aperture smaller than f/4.5. There 's another way of securing correct focus . Using the distance scale @ on the lens, set the focusing ring in accordance with the measured distance. Be sure to gauge the distance between the subject and the film plane indicator-e-@ . Note: The FM2 viewfinder covers approx. 93 % of the image area of the actual photograph so the actual picture comes out larger tha n the image in the viewfinder. Note that the picture comes out trimmed down in the case of mounted slides or service-size prints from negatives. With AF Nikkor lenses: Set the lens' A-M ring or A-M switch to "M." 26
-
 1
1 -
2
-
3
-
4
-
5
-
6
-
7
-
8
-
9
-
10
-
11
-
12
-
13
-
14
-
15
-
16
-
17
-
18
-
19
-
20
-
 21
21 -
 22
22 -
 23
23 -
 24
24 -
 25
25 -
 26
26 -
 27
27 -
 28
28 -
 29
29 -
 30
30 -
 31
31 -
32
-
33
-
34
-
35
-
36
-
37
-
38
-
39
-
40
-
41
-
42
-
43
-
44
-
45
-
46
-
47
-
48
-
49
-
50
-
51
 |
 |
