Nikon 25412 D80 User's Manual - Page 109
Built-in flash, Commander Mode
 |
UPC - 018208254125
View all Nikon 25412 manuals
Add to My Manuals
Save this manual to your list of manuals |
Page 109 highlights
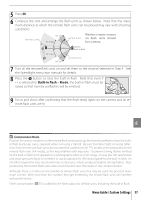
5 Press OK. 6 Compose the shot and arrange the flash units as shown below. Note that the maxi- mum distance at which the remote flash units can be placed may vary with shooting conditions. 10 m/33 ft. or less 60°-30° 30° or less 5 m/16 ft. or less Wireless remote sensors on flash units should face camera. Camera (built-in flash) 30° or less 60°-30° 5 m/16 ft. or less 7 Turn all the remote flash units on and set them to the channel selected in Step 4. See the Speedlight instruction manuals for details. 8 Press the button to raise the built-in flash. Note that even if - - is selected for Built-in flash > Mode, the built-in flash must be raised so that monitor preflashes will be emitted. 9 Focus and shoot after confirming that the flash-ready lights on the camera and all remote flash units are lit. Commander Mode Position the sensor windows on the remote flash units to pick up the monitor preflashes from the builtin flash (particular care is required when not using a tripod). Be sure that direct light or strong reflections from the remote flash units do not enter the camera lens (in TTL mode) or the photocells on the remote flash units (AA mode), as this may interfere with exposure. To prevent timing flashes emitted by the built-in flash from appearing in photographs taken at short range, choose low ISO sensitivities and small apertures (large f/-numbers) or use an optional SG-3IR infrared panel for the built-in flash. An SG-3IR is required for best results with rear-curtain sync, which produces brighter timing flashes. After positioning the remote flash units, take a test shot and view the results in the camera monitor. Although there is no limit on the number of remote flash units that may be used, the practical maximum is three. With more than this number, the light emitted by the remote flash units will interfere with performance. Flash compensation ( 55) is added to the flash output for all flash units, including the built-in flash. Menu Guide / Custom Settings 97
-
 1
1 -
2
-
3
-
4
-
5
-
6
-
7
-
8
-
9
-
10
-
11
-
12
-
13
-
14
-
15
-
16
-
17
-
18
-
19
-
20
-
21
-
22
-
23
-
24
-
25
-
26
-
27
-
28
-
29
-
30
-
31
-
32
-
33
-
34
-
35
-
36
-
37
-
38
-
39
-
40
-
41
-
42
-
43
-
44
-
45
-
46
-
47
-
48
-
49
-
50
-
51
-
52
-
53
-
54
-
55
-
56
-
57
-
58
-
59
-
60
-
61
-
62
-
63
-
64
-
65
-
66
-
67
-
68
-
69
-
70
-
71
-
72
-
73
-
74
-
75
-
76
-
77
-
78
-
79
-
80
-
81
-
82
-
83
-
84
-
85
-
86
-
87
-
88
-
89
-
90
-
91
-
92
-
93
-
94
-
95
-
96
-
97
-
98
-
99
-
100
-
101
-
102
-
103
-
 104
104 -
 105
105 -
 106
106 -
 107
107 -
 108
108 -
 109
109 -
 110
110 -
 111
111 -
 112
112 -
 113
113 -
 114
114 -
115
-
116
-
117
-
118
-
119
-
120
-
121
-
122
-
123
-
124
-
125
-
126
-
127
-
128
-
129
-
130
-
131
-
132
-
133
-
134
-
135
-
136
-
137
-
138
-
139
-
140
-
141
-
142
-
143
-
144
-
145
-
146
-
147
-
148
-
149
-
150
-
151
-
152
-
153
-
154
-
155
-
156
-
157
-
158
-
159
-
160
-
161
-
162
 |
 |
