Nikon 5600 User Manual - Page 51
Scene Mode, Panorama Assist, Using a Tripod, Storage Locations for Panoramas, Joining Panorama
 |
View all Nikon 5600 manuals
Add to My Manuals
Save this manual to your list of manuals |
Page 51 highlights
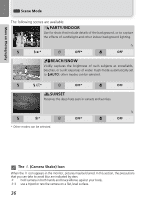
More on Photography 5 AE-L e Scene Mode Take first picture. About one third of picture is shown superimposed on view through lens (if pan direction is left to right, picture will appear on left side of monitor). 5M 10 6 AE-L AF 7 5M 10 Compose the next shot to overlap with Take the next picture. the previous picture. Repeat steps 6 and 7 until all shots in se- ries have been taken. 8 End series. Shooting will also end if a new mode is selected or camera enters standby mode. Panorama Assist The pan direction, flash mode, macro close-up mode, and exposure compensation can not be changed after the first picture is taken. To change the pan direction, press ^ button to end shooting and repeat steps 1-3. Using a Tripod Using a tripod makes it easier to compose shots so that they overlap. Storage Locations for Panoramas Each series of pictures taken at Panorama assist is stored in a separate folder with a name consisting of "P" preceded by a three-digit folder number and followed by a three-digit sequence number (e.g., "101P 002"). Joining Panorama Pictures Transfer the pictures taken with Panorama Assist to your computer (Q 49) and use the Panorama Maker function in PictureProject to join them into a single scene. For further information, see the PictureProject Reference Manual (on CD-ROM). 41
-
 1
1 -
2
-
3
-
4
-
5
-
6
-
7
-
8
-
9
-
10
-
11
-
12
-
13
-
14
-
15
-
16
-
17
-
18
-
19
-
20
-
21
-
22
-
23
-
24
-
25
-
26
-
27
-
28
-
29
-
30
-
31
-
32
-
33
-
34
-
35
-
36
-
37
-
38
-
39
-
40
-
41
-
42
-
43
-
44
-
45
-
 46
46 -
 47
47 -
 48
48 -
 49
49 -
 50
50 -
 51
51 -
 52
52 -
 53
53 -
 54
54 -
 55
55 -
 56
56 -
57
-
58
-
59
-
60
-
61
-
62
-
63
-
64
-
65
-
66
-
67
-
68
-
69
-
70
-
71
-
72
-
73
-
74
-
75
-
76
-
77
-
78
-
79
-
80
-
81
-
82
-
83
-
84
-
85
-
86
-
87
-
88
-
89
-
90
-
91
-
92
-
93
-
94
-
95
-
96
-
97
-
98
-
99
-
100
-
101
-
102
-
103
-
104
-
105
-
106
-
107
-
108
-
109
-
110
-
111
-
112
-
113
-
114
-
115
-
116
-
117
-
118
-
119
-
120
-
121
-
122
-
123
-
124
-
125
-
126
-
127
-
128
 |
 |
