Nikon COOLPIX L25 Reference Manual - Page 46
Step 3 Focus and Shoot, Press the shutter-release button halfway, the way down - red
 |
View all Nikon COOLPIX L25 manuals
Add to My Manuals
Save this manual to your list of manuals |
Page 46 highlights
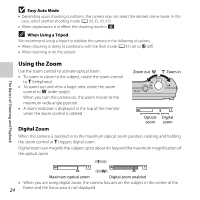
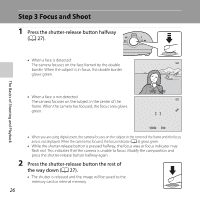
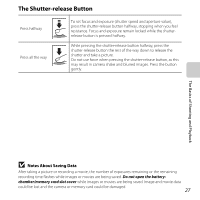
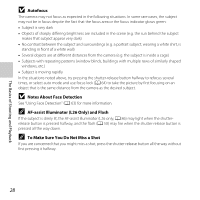
Step 3 Focus and Shoot 1 Press the shutter-release button halfway (A 27). The Basics of Shooting and Playback • When a face is detected: The camera focuses on the face framed by the double border. When the subject is in focus, the double border glows green. • When a face is not detected: The camera focuses on the subject in the center of the frame. When the camera has focused, the focus area glows green. 1 / 2 5 0 F 3.2 1 / 2 5 0 F 3.2 • When you are using digital zoom, the camera focuses on the subject in the center of the frame and the focus area is not displayed. When the camera has focused, the focus indicator (A 6) glows green. • While the shutter-release button is pressed halfway, the focus area or focus indicator may flash red. This indicates that the camera is unable to focus. Modify the composition and press the shutter-release button halfway again. 2 Press the shutter-release button the rest of the way down (A 27). • The shutter is released and the image will be saved to the memory card or internal memory. 26
-
 1
1 -
2
-
3
-
4
-
5
-
6
-
7
-
8
-
9
-
10
-
11
-
12
-
13
-
14
-
15
-
16
-
17
-
18
-
19
-
20
-
21
-
22
-
23
-
24
-
25
-
26
-
27
-
28
-
29
-
30
-
31
-
32
-
33
-
34
-
35
-
36
-
37
-
38
-
39
-
40
-
 41
41 -
 42
42 -
 43
43 -
 44
44 -
 45
45 -
 46
46 -
 47
47 -
 48
48 -
 49
49 -
 50
50 -
 51
51 -
52
-
53
-
54
-
55
-
56
-
57
-
58
-
59
-
60
-
61
-
62
-
63
-
64
-
65
-
66
-
67
-
68
-
69
-
70
-
71
-
72
-
73
-
74
-
75
-
76
-
77
-
78
-
79
-
80
-
81
-
82
-
83
-
84
-
85
-
86
-
87
-
88
-
89
-
90
-
91
-
92
-
93
-
94
-
95
-
96
-
97
-
98
-
99
-
100
-
101
-
102
-
103
-
104
-
105
-
106
-
107
-
108
-
109
-
110
-
111
-
112
-
113
-
114
-
115
-
116
-
117
-
118
-
119
-
120
-
121
-
122
-
123
-
124
-
125
-
126
-
127
-
128
-
129
-
130
-
131
-
132
-
133
-
134
-
135
-
136
-
137
-
138
-
139
-
140
-
141
-
142
-
143
-
144
-
145
-
146
-
147
-
148
-
149
-
150
-
151
-
152
-
153
-
154
-
155
-
156
-
157
-
158
-
159
-
160
-
161
-
162
-
163
-
164
-
165
-
166
-
167
-
168
-
169
-
170
-
171
-
172
-
173
-
174
-
175
-
176
-
177
-
178
-
179
-
180
-
181
-
182
-
183
-
184
-
185
-
186
-
187
-
188
-
189
-
190
-
191
-
192
-
193
-
194
-
195
-
196
-
197
-
198
-
199
-
200
-
201
-
202
-
203
-
204
 |
 |
