Nikon COOLPIX W100 Quick Start Guide - English for customers in the Americas - Page 13
Pairing, Could, not connect., Reconnect, Cancel
 |
View all Nikon COOLPIX W100 manuals
Add to My Manuals
Save this manual to your list of manuals |
Page 13 highlights
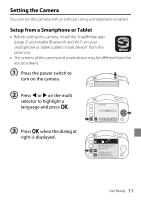
5 Check the authentication code. • After checking that the camera and smart device display the same six-digit authentication Auth. code 000000 Confirm that the same authentication code is displayed on the smart device and press OK. code, and then follow the steps below (note that the Camera code may not be displayed in some versions of iOS, but you should follow the steps below even if the code is not displayed). - On the camera, press O. - On the smart device, tap Pairing (the name of the button may be different depending on the smart device). 6 Press A when the dialog at right is displayed. • If the camera displays Could not connect., press R Reconnect to return to step 4. To cancel pairing settings, press SCancel. Your camera and smart device are connected! SnapBridge will send your photos to your smart device as they are taken. 7 Select whether to add shooting location information to the images that you take. • To add location data to images, select RYes. Turn on the Download location data from smart device? Yes No location data features in the SnapBridge app and on the smart device (for more information, see the instructions included with the smart device). Get Ready 13
-
 1
1 -
2
-
3
-
4
-
5
-
6
-
7
-
 8
8 -
 9
9 -
 10
10 -
 11
11 -
 12
12 -
 13
13 -
 14
14 -
 15
15 -
 16
16 -
 17
17 -
 18
18 -
19
-
20
-
21
-
22
-
23
-
24
-
25
-
26
-
27
-
28
-
29
-
30
-
31
-
32
-
33
-
34
-
35
-
36
-
37
-
38
-
39
-
40
-
41
-
42
-
43
-
44
-
45
-
46
-
47
-
48
 |
 |
