Nikon N65 Instruction Manual - Page 7
Select, Adjust - n65qd
 |
UPC - 018208123452
View all Nikon N65 manuals
Add to My Manuals
Save this manual to your list of manuals |
Page 7 highlights
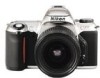
~ Viewfinder eyepiece Rubber eyecup (P. 67) Diopter adjustment lever (P. 67) Command Dial Camera back lock release lever (P. 20) Film confirmation window (P. 21) Data Back (N65QD only) (P. 22/39) Tripod socket • Illustration shown is the N65QD. The camera back of the N65 differs from the N65QD . • N65QD only: Data imprint LCD/buttons 1 RI T.., 2 ~OO-'Ot-O;;.-'o:nCli~ li I fimD• SEL•ECT A•DJUST 1. Date/time display LCD 2. ' : Year indicator 3. MODE button: Push to select one of five available displays. 4. SELECT button : Push to select date/time to be adjusted . 5. M : Month indicator 6. - : Data imprint indicator: Blinks approx. 2 sec. when data is imprinted. 7. ADJUST button : Push to adjust date/time. 7
-
 1
1 -
 2
2 -
 3
3 -
 4
4 -
 5
5 -
 6
6 -
 7
7 -
 8
8 -
 9
9 -
 10
10 -
 11
11 -
 12
12 -
13
-
14
-
15
-
16
-
17
-
18
-
19
-
20
-
21
-
22
-
23
-
24
-
25
-
26
-
27
-
28
-
29
-
30
-
31
-
32
-
33
-
34
-
35
-
36
-
37
-
38
-
39
-
40
-
41
-
42
-
43
-
44
-
45
-
46
-
47
-
48
-
49
-
50
-
51
-
52
-
53
-
54
-
55
-
56
-
57
-
58
-
59
-
60
-
61
-
62
-
63
-
64
-
65
-
66
-
67
-
68
-
69
-
70
-
71
-
72
-
73
-
74
-
75
-
76
-
77
-
78
-
79
-
80
-
81
-
82
-
83
-
84
-
85
-
86
-
87
-
88
-
89
-
90
-
91
-
92
-
93
-
94
-
95
-
96
-
97
-
98
-
99
-
100
-
101
-
102
-
103
-
104
-
105
-
106
-
107
-
108
-
109
-
110
-
111
-
112
-
113
-
114
-
115
-
116
 |
 |

•••••••••••••••••••••••
Viewfinder eyepiece
Rubber eyecup
(P.
67)
Camera back lock
release lever
(P
.
20)
Film confirmation
window
(P
.
21)
Data Back (N65QD only)
(P
.
22
/
39)
Tripod socket
Diopter adjustment lever
(P.
67)
Command Dial
• Illustration shown is the N65QD. The camera back of the N65 differs from the
N65QD .
• N65QD only: Data
imprint
LCD/buttons
1
-
....
::..::..'--',
RI
T..,
2
~
-'t-;;-':nli
li
I
OOOO.oC
~
fimD
SELECT
ADJUST
•
•
•
1.
Date/time display LCD
2.
' :
Year
indicator
3.
MODE button: Push to select one of five
available displays.
4.
SELECT button: Push to select date/time
to be adjusted.
5.
M :
Month indicator
6.
-:
Data imprint indicator: Blinks
approx. 2 sec. when data
is
imprinted.
7.
ADJUST button: Push to adjust
date/time.
7