Nokia 6162 User Guide - Page 57
Modem installation, • Create Additional modem installations, Nokia 6385 3G Packet Data Modem - manual
 |
View all Nokia 6162 manuals
Add to My Manuals
Save this manual to your list of manuals |
Page 57 highlights
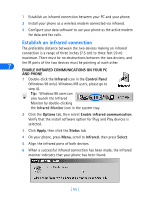
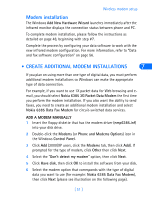
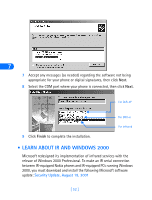
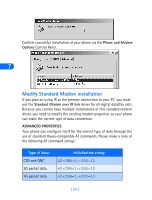
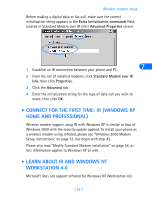
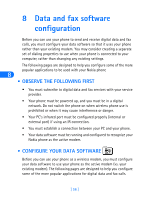
Wireless modem setup Modem installation The Windows Add New Hardware Wizard launches immediately after the infrared monitor displays the connection status between phone and PC. To complete modem installation, please follow the instructions as detailed on page 48, beginning with step #7. Complete the process by configuring your data software to work with the new infrared modem configuration. For more information, refer to "Data and fax software configuration" on page 56. • CREATE ADDITIONAL MODEM INSTALLATIONS 7 If you plan on using more than one type of digital data, you must perform additional modem installations so Windows can make the appropriate type of data connection. For example, if you want to use 1X packet data for Web browsing and email, you should select Nokia 6385 3G Packet Data Modem the first time you perform the modem installation. If you also want the ability to send faxes, you need to create an additional modem installation and select Nokia 6385 Data Fax Modem for circuit-switched data services. ADD A MODEM MANUALLY 1 Insert the floppy diskette that has the modem driver (nmp6385.inf) into your disk drive. 2 Double-click the Modems (or Phone and Modems Options) icon in the Windows Control Panel. 3 Click Add (2000/XP users, click the Modems tab, then click Add). If prompted for the type of modem, click Other then click Next. 4 Select the "Don't detect my modem" option, then click Next. 5 Click Have disk, then click OK to install the software from your disk. 6 Select the modem option that corresponds with the type of digital data you want to use (for example: Nokia 6385 Data Fax Modem), then click Next (please see illustration on the following page). [ 51 ]
-
 1
1 -
2
-
3
-
4
-
5
-
6
-
7
-
8
-
9
-
10
-
11
-
12
-
13
-
14
-
15
-
16
-
17
-
18
-
19
-
20
-
21
-
22
-
23
-
24
-
25
-
26
-
27
-
28
-
29
-
30
-
31
-
32
-
33
-
34
-
35
-
36
-
37
-
38
-
39
-
40
-
41
-
42
-
43
-
44
-
45
-
46
-
47
-
48
-
49
-
50
-
51
-
 52
52 -
 53
53 -
 54
54 -
 55
55 -
 56
56 -
 57
57 -
 58
58 -
 59
59 -
 60
60 -
 61
61 -
 62
62 -
63
-
64
-
65
-
66
-
67
-
68
-
69
-
70
-
71
-
72
-
73
-
74
-
75
-
76
-
77
-
78
-
79
-
80
-
81
-
82
-
83
-
84
-
85
-
86
-
87
-
88
-
89
-
90
-
91
-
92
-
93
-
94
-
95
-
96
-
97
-
98
 |
 |