NordicTrack Ebu Nt 9600 International Bike Canadian English Manual - Page 32
Part List
 |
View all NordicTrack Ebu Nt 9600 International Bike manuals
Add to My Manuals
Save this manual to your list of manuals |
Page 32 highlights
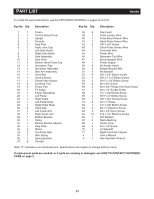
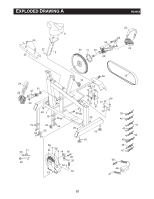
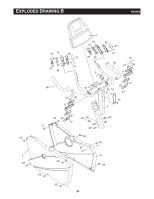
PART LIST R0305A To locate the parts listed below, see the EXPLODED DRAWING on pages 32 and 33. Key No. Qty. Description Key No. Qty. Description 1 1 Frame 2 1 Control Board Cover 3 1 Upright 4 1 Console 5 1 Seat Post 6 1 Audio Jack Cap 7 1 Left Side Shield 8 1 Right Side Shield 9 1 Seat Assembly 10 1 Seat Knob 11 2 Bottom Hand Pulse Grip 12 1 Accessory Tray 13 1 Generator Assembly 14 1 Idler Arm Assembly 15 1 Drive Belt 16 1 Control Board 17 1 Chest Pulse Sensor 18 2 Levelling Foot 19 2 Frame Pad 20 1 TV Cable 21 1 Power Receptical 22 1 Left Pedal 23 1 Right Pedal 24 1 Left Pedal Strap 25 1 Right Pedal Strap 26 2 Hand Grip 27 1 Left Crank Arm 28 1 Right Crank Arm 29 1 Bottom Bracket 30 1 Pulley 31 1 Bottom Bracket Adapter 32 1 Step Plate 33 2 Wheel 34 2 Top Pulse Grip 35 1 Idler Spring 36 1 Spring Bracket 37 8 Contact 38 8 Grip Insert 39 1 Pulse Jumper Wire 40 1 Pulse Board Return Wire 41 1 Hand Pulse Sensor Wire 42 6 3/8" x 3/4" Screw 43 1 Chest Pulse Sensor Wire 44 1 Controller Wire 45 1 Power Wire 46 1 Generator Coil Wire 47 1 Electromagnet Wire 48 1 Power Supply 49 6 #8 Anchor Insert 50 2 Bottom Bracket Bolt 51 4 #8 Standoff 52 8 3/8" x 3/4" Button Screw 53 4 3/8" x 1 1/4" Button Screw 54 2 5/16" x 1/2" Button Screw 55 2 #8 x 3/4" Screw 56 2 #8 x 3/4" Phillips Pan Head Screw 57 1 #8 x 1/4" Socket Screw 58 4 1/4" x 3/8 Socket Screw 59 2 5/16" x 2" Button Screw 60 1 3/8" x 3/4" Socket Screw 61 8 #6 x 1" Screw 62 1 1/4" x 3/8" Button Screw 63 2 #4 x 1" Machine Screw 64 4 #8 x 1/4" Nylon Screw 65 10 #10 x 1/2" Machine Screw 66 1 3/8" Washer 67 2 Nylon Bushing 68 1 Power Cord 69 4 #4 x 1/4" Screw 70 2 #4 Standoff 71 1 Right Crank Arm Spacer # 1 User's Manual # 1 Hex Key/Allen Wrench Note: "#" indicates a non-illustrated part. Specifications are subject to change without notice. If replacement parts are needed, or if parts are missing or damaged, see HOW TO CONTACT CUSTOMER CARE on page 2. 31
-
 1
1 -
2
-
3
-
4
-
5
-
6
-
7
-
8
-
9
-
10
-
11
-
12
-
13
-
14
-
15
-
16
-
17
-
18
-
19
-
20
-
21
-
22
-
23
-
24
-
25
-
26
-
 27
27 -
 28
28 -
 29
29 -
 30
30 -
 31
31 -
 32
32 -
 33
33 -
 34
34 -
 35
35
 |
 |