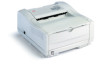
Oki B4200 Guide: Software Installation B4200 (American English) - Page 4
USB Install, Windows - oki printer
 |
View all Oki B4200 manuals
Add to My Manuals
Save this manual to your list of manuals |
Page 4 highlights
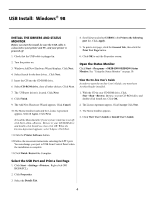
USB Install: Windows® 98 INSTALL THE DRIVERS AND STATUS MONITOR Before you start the install, be sure the USB cable is connected to your printer and PC, and your printer is powered off. 1. Check that the USB cable is plugged in. 2. Turn the printer on. 3. Windows Add New Hardware Wizard displays. Click Next. 4. Select Search for the best driver... Click Next. 5. Insert the CD into the CD-ROM drive. 6. Select CD-ROM drive, clear all other choices. Click Next. 7. The USB port driver is located. Click Next. 8. Click Finish. 9. The Add New Hardware Wizard appears. Click Cancel. 10.The Menu Installer loads and the License Agreement appears. Select I Agree. Click Next. To load the Menu Installer if your system's Autorun is set off, click Start→Run→Browse. Browse to your CD-ROM drive and double-click Install.exe, then click OK. When the License Agreement appears, select I Agree. Click Next. 11.Click the Printer Software button. 12.Follow the on-screen instructions selecting the LPT1 port. You can change your port to USB from Control Panel when the installation is complete. 13.Click Finish. Restart the Computer. 4. Scroll down and select USB001 in the Print to the following port list. Click Apply. 5. To print a test page, click the General Tab, then click the Print Test Page button. 6. Click OK to exit the Properties screen. Open the Status Monitor Click Start→Programs→OKIB4200/OKIB4200 Status Monitor. See "Using the Status Monitor" on page.10. View the On-line User's Guide In order to open the on-line User's Guide, you must have Acrobat Reader installed. 1. With the CD in your CD-ROM drive, Click Star→Run→Browse. Browse to your CD-ROM drive and double-click Install.exe. Click OK. 2. The License Agreement appears. Click I Accept. Click Next. 3. The Menu Installer appears. 4. Click View User's Guide or Install User's Guide. Select the USB Port and Print a Test Page 1. Click Start →Settings→Printers. Right-click OKI B4200(PCL). 2. Click Properties. 3. Select the Details Tab. 4
-
 1
1 -
 2
2 -
 3
3 -
 4
4 -
 5
5 -
 6
6 -
 7
7 -
 8
8 -
 9
9 -
 10
10 -
11
-
12
 |
 |
