Oki C9600hnColorSignage OkiLAN 510w Configuration Guide
Oki C9600hnColorSignage Manual
 |
View all Oki C9600hnColorSignage manuals
Add to My Manuals
Save this manual to your list of manuals |
Oki C9600hnColorSignage manual content summary:
- Oki C9600hnColorSignage | OkiLAN 510w Configuration Guide - Page 1
- Oki C9600hnColorSignage | OkiLAN 510w Configuration Guide - Page 2
in this manual will not my.okidata.com. Copyright © 2005 by Oki Data Americas, Corp. Microsoft and Windows are either registered trademarks or trademarks of Microsoft Corporation in the United States and/or other countries. Netscape is a registered trademark of of Netscape Communications Corporation - Oki C9600hnColorSignage | OkiLAN 510w Configuration Guide - Page 3
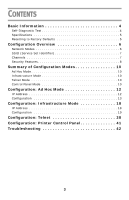
5 Resetting to Factory Defaults 5 Configuration Overview 6 Network Modes 6 SSID (Service Set Identifier 7 Channels 7 Security Features 8 Summary of Configuration Modes 10 IP Address 18 Configuration 19 Configuration: Telnet 38 Configuration: Printer Control Panel 41 Troubleshooting 42 3 - Oki C9600hnColorSignage | OkiLAN 510w Configuration Guide - Page 4
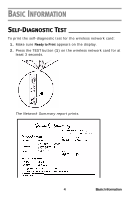
BASIC INFORMATION SELF-DIAGNOSTIC TEST To print the self-diagnostic test for the wireless network card: 1. Make sure Ready to Print appears on the display. 2. Press the TEST button (1) on the wireless network card for at least 3 seconds. The Network Summary report prints. 4 Basic Information - Oki C9600hnColorSignage | OkiLAN 510w Configuration Guide - Page 5
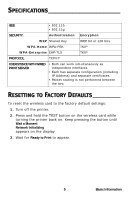
WPA-Enterprise EAP-TLS TKIP PROTOCOL TCP/IP COEXISTENCE WITH WIRED PRINT SERVER • Both can work simultaneously as independent interfaces • Each has settings: 1. Turn off the printer. 2. Press and hold the TEST button on the wireless card while turning the printer back on. Keep pressing the - Oki C9600hnColorSignage | OkiLAN 510w Configuration Guide - Page 6
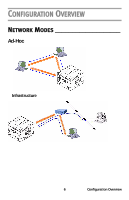
CONFIGURATION OVERVIEW NETWORK MODES Ad-Hoc Infrastructure 6 Configuration Overview - Oki C9600hnColorSignage | OkiLAN 510w Configuration Guide - Page 7
SSID (SERVICE SET IDENTIFIER) _________ In a wireless network, terminals can be assigned an SSID identifier which restricts their access to printers on the network to only those set up for that SSID. For example, computers set up as Accounting can only communicate to a printer through the Marketing - Oki C9600hnColorSignage | OkiLAN 510w Configuration Guide - Page 8
using EAP, connection to the wireless network is requested through an access point, which in turn transmits the certificate assigned to the computer and printer to an authentication server such as RADIUS. • EAP-TLS is used for authentication. • Client and/or CA certificates must be imported into the - Oki C9600hnColorSignage | OkiLAN 510w Configuration Guide - Page 9
requires authentication of the Server Certificate issued by a Certificate Authority and sent from a RADIUS server. • Certificate Authentication requires that the printer have a certificate issued by the Certificate Authority that issued the Server Certificate. • Required file formats = [PEM] or [DER - Oki C9600hnColorSignage | OkiLAN 510w Configuration Guide - Page 10
• Open (no security) • WEP Shared Key Security • WPA Pre-Shared Key Security • EAP Certification Security TELNET MODE This mode sets up the printer using Telnet commands. Available security features for this mode include • Open (No Security) • WEP Shared Key Security • WPA Pre-Shared Key Security - Oki C9600hnColorSignage | OkiLAN 510w Configuration Guide - Page 11
You can set up an SSID of your choice for accessing the printer over a wireless network, but no other security can be configured through the control panel. 11 Summary of Configuration Modes - Oki C9600hnColorSignage | OkiLAN 510w Configuration Guide - Page 12
These instructions assume the following: • You have connected the printer's built-in print server. • You have configured both the printer's and 4) under TCP/IP Configuration. To set the IP Address manually, use the printer menu: 1. With Ready to Print on the display, press ENTER to switch to the Menu - Oki C9600hnColorSignage | OkiLAN 510w Configuration Guide - Page 13
Wireless Computer Set the IP Address using Microsoft Windows® Control Panel. CONFIGURATION Configuration Using Web Browser 1. Open the browser. 2. Enter the IP Address for the printer's built-in print server and press the Enter key. 3. Click [Change Slot]. 13 Configuration: Ad Hoc Mode - Oki C9600hnColorSignage | OkiLAN 510w Configuration Guide - Page 14
4. Select PCI Slot2:Wireless, then click [OK]. 5. Click Administrator Login. 6. Enter User ID = root Password = last six digits of the Mac (Ethernet) Address for the wireless card (under General Information on the Network Summary printout-see page 4), minus the punctuation marks. 7. Click [Skip]. - Oki C9600hnColorSignage | OkiLAN 510w Configuration Guide - Page 15
9. Click [Wireless LAN] on the left side of the screen. 10. Make your selections: • Network Type = Ad Hoc • Communication Mode = AUTO or 802.11b • Channel = 1 through 13 (to ensure speed and accuracy when using wireless access points which are near each other, be sure to leave 5 blank channels - Oki C9600hnColorSignage | OkiLAN 510w Configuration Guide - Page 16
from CD-ROM] → [Next]. 2. Wait for the software to discover the printer (if automatic discovery fails, click [File] → [Search]). The printer appears as MLETB13 or OkiLAN8200e. 3. Click the discovered printer, then select [Oki Device Setup] from the Setup menu. 4. Select [Guest User], click [OK - Oki C9600hnColorSignage | OkiLAN 510w Configuration Guide - Page 17
5. On the [General] tab, click [Change SLOT], then click [Yes]. 6. Referring to the Network Summary printout for the wireless card (under General Information), enter the last six digits of the Mac address as the password (minus any punctuation), then click [OK]. 7. Scroll over to the far right and - Oki C9600hnColorSignage | OkiLAN 510w Configuration Guide - Page 18
instructions assume the following: • You have connected the printer's built-in print server to a computer via an access point. • You have configured both the printer /IP Configuration. To set the IP Address manually, use the printer menu: 1. With Ready to Print on the display, press ENTER to switch - Oki C9600hnColorSignage | OkiLAN 510w Configuration Guide - Page 19
7. Use the ∇ and ∆ buttons to scroll to [Subnet Mask], then use the ∇ and ∆ buttons to set the Subnet Mask values. Press ENTER. 8. Press BACK. 9. Use the ∇ and ∆ buttons to scroll to [Gateway Address], then use the ∇ and ∆ buttons to set the Gateway Address. Press ENTER. 10. Press ON-LINE to exit - Oki C9600hnColorSignage | OkiLAN 510w Configuration Guide - Page 20
2. Enter the IP Address for the wireless card and press the Enter key. 3. Click [Change Slot]. 20 Configuration: Infrastructure Mode - Oki C9600hnColorSignage | OkiLAN 510w Configuration Guide - Page 21
4. Select PCI Slot2:Wireless, then click [OK]. 5. Click Administrator Login. 6. Enter User ID = root Password = last six digits of the Mac (Ethernet) Address for the wireless card (under General Information on the Network Summary printout-see page 4), minus the punctuation marks. 7. Click [Skip]. 8. - Oki C9600hnColorSignage | OkiLAN 510w Configuration Guide - Page 22
9. Click [Wireless LAN] on the left side of the screen. 10. Make your selections: • Network Type = Infrastructure • Communication Mode = AUTO or 802.11b • SSID = (name you select) • Authentication: - Open (no security) 22 Configuration: Infrastructure Mode - Oki C9600hnColorSignage | OkiLAN 510w Configuration Guide - Page 23
- Shared Key (WEP) - WPA (Pre-Shared Security) 23 Configuration: Infrastructure Mode - Oki C9600hnColorSignage | OkiLAN 510w Configuration Guide - Page 24
- EAP (for more information on setting up EAP security, see "Setting Up EAP Using Web Browser" below). 11. Click [Submit]. 24 Configuration: Infrastructure Mode - Oki C9600hnColorSignage | OkiLAN 510w Configuration Guide - Page 25
Setting Up EAP Using Web Browser NOTES Certificates must be obtained separately by the network administrator before setting the printer for EAP. These instructions assume you have performed steps 1 through 10 under "Configuration Using Web Browser" , starting on page 19. For more information on EAP, - Oki C9600hnColorSignage | OkiLAN 510w Configuration Guide - Page 26
ᮣ To Use the Client Certificate 1. Select the Client Certificate setting. Note: Normally the SSL/TLS Certificate should NOT be selected. It is often not authenticated by the RADIUS Server because it does not contain Client Authentication in the Extend Key Usage attributes. If you select SSL/ TLS, - Oki C9600hnColorSignage | OkiLAN 510w Configuration Guide - Page 27
5. Click [OK]. NOTE To view the certificate, open the EAP Setting window by clicking EAP, then click the newly added [View] button. 6. If you wish to add Server Authentication, see the next section. Otherwise, click [Submit]. ᮣ To Add Server Authentication 27 Configuration: Infrastructure Mode - Oki C9600hnColorSignage | OkiLAN 510w Configuration Guide - Page 28
1. Select [Authenticate Server] under [CA Certificate Setting]. The [Import] button appears. 2. Click [Import]. 3. Fill in (or browse to) the name of the certificate file to be imported, then click [OK]. The certification file is imported. When complete, a result window appears. 4. Click [Close]. 28 - Oki C9600hnColorSignage | OkiLAN 510w Configuration Guide - Page 29
5. Click [OK]. NOTE To view the certificate, open the EAP Setting window by clicking [EAP], then click the newly added [View] button. 6. Click [Submit]. 29 Configuration: Infrastructure Mode - Oki C9600hnColorSignage | OkiLAN 510w Configuration Guide - Page 30
from CD-ROM] → [Next]. 2. Wait for the software to discover the printer (if automatic discovery fails, click [File] → [Search]). The printer appears as MLETB13 or OkiLAN8200e. 3. Click the discovered printer, then select [Oki Device Setup] from the Setup menu. 4. Select [Guest User], click [OK - Oki C9600hnColorSignage | OkiLAN 510w Configuration Guide - Page 31
5. On the [General] tab, click [Change SLOT], then click [Yes]. 6. Referring to the Network Summary printout for the wireless card (under General Information), enter the last six digits of the Mac address as the password, then click [OK]. 7. Scroll over to the far right and select the [Wireless] tab - Oki C9600hnColorSignage | OkiLAN 510w Configuration Guide - Page 32
- Shared Key (WEP) - WPA (Pre-Shared Security) 32 Configuration: Infrastructure Mode - Oki C9600hnColorSignage | OkiLAN 510w Configuration Guide - Page 33
- EAP (for more information on setting up EAP security, see "Setting Up EAP Using Web Browser" below). 9. Click [Initialize]. 33 Configuration: Infrastructure Mode - Oki C9600hnColorSignage | OkiLAN 510w Configuration Guide - Page 34
Setting Up EAP Using AdminManager NOTES Certificates must be obtained separately by the network administrator before setting the printer for EAP. These instructions assume you have performed steps 1 through 8 under "Configuration Using AdminManager" , starting on page 30. For more information on EAP - Oki C9600hnColorSignage | OkiLAN 510w Configuration Guide - Page 35
ᮣ To Use a Client Certificate 1. Select EAP under [Authentication], then click [EAP]. 2. Click [Certificate]. 3. Type in the name of the certificate file to be imported, or click [...] to browse to it. 4. Type in the password provided by the issuer of the certificate. 5. Click [Import]. 6. Click [OK - Oki C9600hnColorSignage | OkiLAN 510w Configuration Guide - Page 36
7. Click [OK]. ᮣ To Add Server Authentication 1. Under [CA Certificate], type in the name of the certificate file to be imported, or click [...] to browse to it. 2. Click [Import]. 3. Click [OK] to confirm the import. The certification file is imported. When complete, a result window appears. 4. - Oki C9600hnColorSignage | OkiLAN 510w Configuration Guide - Page 37
5. Enter the user name to be distributed along with the certificate by the network administrator under [EAP User] and select [Authenticate Server]. then click [OK]. 6. Click [Apply] to save the settings to the wireless card. NOTE To view the certificates, click [EAP] on the [Wireless] tab, then - Oki C9600hnColorSignage | OkiLAN 510w Configuration Guide - Page 38
CONFIGURATION: TELNET Before starting, have the NEtwork Summary you printed for the wireless card handy: You will need the IP Address and Mac (Ethernet) Address from it to configure the card. The following assumes: • Windows - Oki C9600hnColorSignage | OkiLAN 510w Configuration Guide - Page 39
No. M E N U (level.1) Slot2: Wireless IEEE802.11g 1: Status / Information 2: Printer Config 3: Network Config 4: Security Config 5: Maintenance 99: Exit Setup Please select(1-99)? 4. Type 3 and hit Enter. No. M E N U (level.2) Slot2: Wireless IEEE802.11g 1: Common 2: TCP/IP 6: - Oki C9600hnColorSignage | OkiLAN 510w Configuration Guide - Page 40
6. To set WEP, type 6 and hit Enter: No. M E N U (level.4) Slot2: Wireless IEEE802.11g 1: Key Size : 64 2: Key Index : 1 3: WEP Key 1 : 4: WEP Key 2 : 5: WEP Key 3 : 6: WEP Key 4 : 99: Back to prior menu Please select(1-99)? 7. To set EAP, type 7 and hit Enter: No. M E N U (level - Oki C9600hnColorSignage | OkiLAN 510w Configuration Guide - Page 41
CONFIGURATION: PRINTER CONTROL PANEL To make changes in the wireless card settings using the control panel: with Ready to Print on the display, press ENTER to switch ] = your choice • [Authentication] = Open • [IP Address] • [Subnet Mask] • [Default Gateway] 41 Configuration: Printer Control Panel - Oki C9600hnColorSignage | OkiLAN 510w Configuration Guide - Page 42
is some basic troubleshooting information. For more detailed information, check out http://my.okidata.com. PROBLEM SOLUTION(S) Communication is area. • Change the location or direction of the access point and printer. Too many wireless devices are using the same or neighboring channel. This - Oki C9600hnColorSignage | OkiLAN 510w Configuration Guide - Page 43
SOLUTION(S) Problems with the access point devices or wireless computers. • Consult the FAQ information of the vendors for the access points and wireless computers. • Check that you have the latest firmware for access point devices. • Check that you have the latest drivers . 43 Troubleshooting - Oki C9600hnColorSignage | OkiLAN 510w Configuration Guide - Page 44
SOLUTION(S) Check the network configuration of the wireless card. • Make sure that IP Address, Subnet Mask and Default Gateway are all set correctly. • Ad-Hoc mode: IP Address cannot be obtained by DHCP. Check the network protocol: • The wireless card supports Server Certificate. 44 Troubleshooting
-
 1
1 -
 2
2 -
 3
3 -
 4
4 -
 5
5 -
 6
6 -
 7
7 -
8
-
9
-
10
-
11
-
12
-
13
-
14
-
15
-
16
-
17
-
18
-
19
-
20
-
21
-
22
-
23
-
24
-
25
-
26
-
27
-
28
-
29
-
30
-
31
-
32
-
33
-
34
-
35
-
36
-
37
-
38
-
39
-
40
-
41
-
42
-
43
-
44
 |
 |
