Oki ML186 Ml 186 Quick Setup Guide - Page 2
ML 186, Quick Setup, Guide - manual
 |
View all Oki ML186 manuals
Add to My Manuals
Save this manual to your list of manuals |
Page 2 highlights
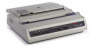
Windows-Based Systems: Install the Printer Driver To print from a Windows-based system, install the printer driver located in the Drivers folder on the CD supplied with your printer. This driver provides full printer capability and will automatically switch the printer to the correct emulation that your software requires. Use the Add Printer Wizard to install the driver: 1. Place the CD in your CD-ROM drive. 2. Click Start → Settings → Printers. 3. Click Add Printer. The Add Printer Wizard appears. 4. Follow the on-screen instructions. 5. When you are prompted to select the manufacturer and printer model, click Have Disk, then browse to the appropriate CD directory and double click the inf file: • Windows XP \Drivers\WinXP\English\Oemprint.inf • Windows 2000 \Drivers\Win2k\English\Oemprint.inf • Windows 98 and Windows Me \Drivers\Win98_Me\English\Oemsetup.inf • Windows 95 \Drivers\Win95\English\Oemsetup.inf • Windows NT 4.0 \Drivers\NT40\English\Printer.inf 6. Follow the on-screen instructions to finish. Non-Windows Systems: Set the Emulationin the Printer Menu If you are using a non-Windows system such as LINUX,® a DOS® program, or an older application such as Word Perfect® 5.1, you must set the correct emulation in the printer menu. If the menu is set to the wrong emulation, you will see strange characters, incorrect fonts, etc. Your printer emulates the following printers: IBM (2480)-factory setting; Epson FX (ESC/P); OKI Microline Note: If you are replacing a Microline ML 184 printer, set the printer menu to match the emulation being used for the existing printer. To change the printer emulation in the printer menu: 1. Load continuous forms paper. 2. Turn the printer off. 3. Press and hold SELECT while turning the printer back on. The printer enters the Menu Mode. 4. Press FORM FEED. The first line prints showing the factory default emulation: PrinterControl Emulation Mode IBM 5. Press TOF SET until the emulation you want appears. 6. Press PITCH and MODE together to save your settings and exit the printer menu. Note: If your Non-Windows system requires you to select a compatible printer driver in your software, see the Online User's Guide for information to do this. Adjusting the Head Gap The head gap is the distance between the print head and the platen roller. When you use envelopes or multi-part forms you will need to have a larger gap than when using plain paper. Use the recommended head gap to ensure the best print quality and easy paper feed. CAUTION: Incorrect setting of the print head gap can cause print head damage or ribbon jams. To adjust the print head gap, move the colored lever located to the left of the ribbon cartridge (a), to the correct position for the type of stationary being used, as detailed below: Paper Type Weight Lever Position Single part paper 14 - 20 lb (52 - 75 gm) 1,2 Form Two part Three part Four part 9 - 11 lb. (35 - 40 gm) with a maximum thickness of 0.28 mm 2 - 3 3 3 Front Panel Operations LED Power Indicates that printer is plugged in and turned on. Select Indicates that the printer is ready to receive data. Alarm Indicates that paper is low or out, or that there is an internal printer problem. Character Indicates which character pitch-in Pitch characters per inch-is engaged. Print Mode Indicates which print mode is engaged. Button Line Feed Moves the paper up one line at a time. Form Feed Moves the paper to the top margin of the next page. TOF Set Sets the top margin at the current position-the Select light must be off. Select Selects or deselects the printer. Pitch Selects the size of the printed characters- 10, 12, or 17 characters per inch (cpi), indicated by the lights next to the button. Mode Selects the type of printing-Near Letter Quality,Utility, High-Speed Draft-indicated by the lights next to the button. Oki Data Americas, Inc. 2000 Bishops Gate Blvd. Mt. Laurel, NJ 08054 http://www.okidata.com 1-800-OKI-DATA (1-800-654-3282) Copyright 2004 by Oki Data Americas, Inc. OKI and Oki Data are registered trademarks of Oki Electric Industry Company, Ltd. Epson is a registered trademark of Seiko Epson Corporation (SEC), registered in the U.S. and other countries. IBM is a registered trademark of IBM Corporation. LINUX is a registered trademark of Linus Torvalds. Windows, Windows NT and DOS are either registered trademarks or trademarks of Microsoft Corporation in the United States and/or other countries. Word Perfect is a registered trademark of Corel Corporation. ML 186 Quick Setup Guide Before you use your printer, you must set up the hardware and install the printer driver; • Identify your computer's Operating System; Windows® XP, 2K, 98, Me, 95, NT® 4.0 • Purchase the correct interface cable (USB or Parallel). • Follow the setup instructions in this guide. To see the Online User's Guide for additional information, select Manuals/Users Guide on the CD supplied with your printer. 59359101
-
 1
1 -
 2
2
 |
 |
